Sunday, June 26, 2011

Metal Gear Solid (MGS): Peace Walker

SCORE: 81
Metal Gear Solid (MGS): Peace Walker essentially picks up the reality of Naked Snake right after MGS 3: Snake Eater and MGS: Portable Ops. Now os 1974, and Snake's a little disillusioned. After obliterating his "treasonous" mentor in MGS 3, Snake departed the U.S. and established Militaires Sans Frontieres, or borderless soldiers, a team that bravely helps the unfortunate. Soon, a student and professor appear begging for help. It appears that the Central Intelligence Agency has overran Costa Rica, and figuring as how the little nation does not have a strong armed services, the duo wants MSF to intervene to set things right. Snake resists the offer, however when the professor gives him a tape that apparently shows the Boss is still alive, MSF accepts the reduce.
The game is devilishly deep. It’s exciting and you'll love all of its small details, but I won't spoil that for you.

The game is impressive and you should play it. It is not complete however, as the co-op is required in certain locations, however the game is still a pure chef-d'oeuvre.

Saturday, June 25, 2011

Disgaea Infinite - PSP Game Review

SCORE: 68
Fans of Disgaea series may never have an easy walk, and now they are confronted with the most dreadful circumstances in Disgaea Infinite. Playing as one of the misfortunate Prinnies, you need to forestall the assassination on Lord Laharl before he does any harm to you. However time is at your advantage, with the assistance of a wondrous being, Prinny's soul can be returned to earlier places in the story arcs should your last effort falls short. The most revolutionary departure is that you have a strictly a visual novel game. If you are anticipating a colorful strategy role-playing game, it isn't the most appropriate game for you.
It is not all laughs and gags, though. Repetitive sequences time and time again gets dull, as does the game's heuristic nature. To rectify this, there is an feature to auto skip, however use it carefully lest you leave out crucial moments. The voices is a little cheesy, and Prinny's excessive use of "dood" may disturb you, but there is an option to use Japanese language or instantly mute the casts. Disgaea Infinite's flexible style offers a short distraction that is well-suited for your PSP experience.

Hexyz Force - PSP Game Review

SCORE: 72
When your task is to ensure the survival of a world, it is crucial that your comrades and your martial arts can back you up completely. The game has a battle arrangement that allows you to be both dynamical and tactical, smiting your oppositions completely without getting reckless. Backed up by a broad array of characters and a couple of unique story arcs, the game gives you a canonical dungeon-running journey that centers on the fundamentals and turns out to be a fulfilling adventure.
You may get through one campaign in approximately twenty to twenty-five hours, and because both primary protagonists occupy different lands and carry out different missions, there are a good deal of urge to complete another campaign once you end the first. You will unlock a couple of perks, for database gallery of characters, products and tunes, but you can not hold over any of your former skills. While you talk with a townsperson who'd like you to execute a specific task, the primary story arc covers just about most of the game. It isn't a complicated ultra-epic with a bottomless plot line and characters you will eternally hold close to the bottom of your heart. It is an average RPG that can raise itself through well-adjusted item and battle systems and a realm that you won't mind saving. The game hands over all the essential basics of an attractive adventure, with sensible performance.

Setting up the DNS Hack

Are you one of the lucky few living in the world of tomorrow with an entire home network that actually networks control of your home? If so, wouldn't it be nice to control your home wirelessly with your PSP? Read on to find out how.

When the Wipeout Pure browser hack came out, I saw someone controlling his Xbox Media Center from his PSP browser. It's great that you can control XBMC from your PSP, but what if your Xbox isn't on, and your TV isn't on, and your TV is not on the right input? You still have to get up or find the remote and adjust all of that.

I've come up with my own solution.

This hack first appeared on LiquidIce's PSP Hacks and quickly spread around to various web sites (go to http://psphacks.blogspot.com/2005/04/psp-home-control-10.html).

The first step was to be able to redirect the Wipeout Pure browser to any URL I wanted. To do that, I turned to MooPS (http://www.layouts.xbox-scene.com/main/filemanager/index.php?action=downloadfile&filename=SetupMooPS_1.0.1.rar&directory=Software&), which is a DNS/web server that you run on your Windows computer. It automatically forwards requests for http://ingame.scea.com to the URL of your choice. For another way to set this up.

If you have Version 2.0 of the firmware, you can simply navigate to the page you create rather than bothering with this redirect, which is only necessary due to the limitations of the Wipeout Pure browser.

Configuring Your PSP


You will now need to configure your PSP to use another DNS server. Follow the instructions discussed in that hack, but instead of entering the IP address of a web portal on the Internet, enter the IP address of your DNS server. Now fire up Wipeout Pure, choose the connection you just created/edited. Nothing too fancy, but the more links you add to the HTML, the more impressive and useful your web portal will be.

Congratulations! You can now create and access custom web pages from your PSP.

If you want your web portal to be accessible to other devices via the Internet, there are a few changes you must make to the method outlined above. First, you will need to change the following entry in scea.zone:

ingame A 192.168.0.100


to:

ingame A XX.XXX.X.XXX


where XX.XXX.X.XXX is the external IP address given to your computer/router. You can find out what this is by going to http://www.whatismyip.com.

The next thing you must do is set up your router to forward incoming traffic on ports 53 and 80 to your DNS/web server. Connecting to a web interface built into your router usually allows you to do this. Consult your router's documentation on how to forward ports to individual machines on your network. You will need to forward ports 53 (UDP) and 80 (TCP) to your web server's internal IP address (i.e., 192.168.0.100, as used earlier).

Finally, change the DNS setting on your PSP to use your computer/router's external IP address instead of your web server's internal IP address.

You should now be able to access your web portal from home or anywhere else.

The Web Server


Now that it is possible to have your PSP access the IP address of your choosing, it's time to set up a web server from which you can serve your custom web portal.

Like the DNS server, the first step is to install a web server on your computer. If you're using a Mac, you can turn on the preinstalled Apache web server by going into System Preferences, clicking the Sharing icon, and checking the box next to "Personal Web Sharing." If you're using Windows or Unix, you will need to install a web server such as Apache (Version 2 suggested). Apache is an open source web server that powers many commercial web sites. It can be downloaded at http://httpd.apache.org/download.cgi. If you're using Windows, you will want to download the .msi install package and follow the instructions that come with it. If installing Apache in a Unix environment, you may be able to find a precompiled install package for your distribution. Otherwise, you'll have to compile the source code yourself and continue installation from there.

Like DNS servers, there are many web servers available. Also, if you have one already installed, there is no reason to install another.

When the PSP makes a request from Wipeout Pure, it asks for the /wipeout/index.html file. So what we must now do is create a file named index.html and place it where the PSP can access it.

Use this html file

Next, you need to create a directory called "wipeout" in your web server's root directory. On a Mac, the root directory will be /Library/WebServer/Documents, so you will create the directory /Library/WebServer/Documents/wipeout (this is not to be confused with the Library folder in your home directory). If you installed Apache in Windows, you will want to create the directory in C:\Program Files\Apache Group\Apache2\htdocs. Then, simply place index.html in the wipeout directory.

If you are using Apache in Unix, or are using another web server, consult the server's documentation to identify the root folder from which web pages are being served.

That's it! Now you can test it using your PSP.

Thursday, June 16, 2011

How to Set Up the PSP DNS Server?


Before you can start serving web pages to your PSP, you need to first trick the PSP into believing that your web server is someone it's not. When you load up the "Downloads" section of Wipeout Pure, your PSP attempts to retrieve data from the following domain: ingame.scea.com. Normally, the IP address returned by your Internet service provider's DNS server would belong to Sony and would direct you to downloadable Wipeout Pure content. However, by setting up your own DNS server, it is possible to "trick" the PSP and return the IP address of a web server of your choice.

The first step in setting up a DNS server is installation. If you are using a Mac or a Unix variant, the most common DNS server used is BIND. If you are using Windows, a good (and free) DNS server is TreeWalk DNS (http://www.ntcanuck.com). Installation guides are included with both of these server packages when you download the software, and are pretty straightforward. Further, these are just recommendations; there are dozens of DNS server software packages available for virtually every platform.

Once installed, you now need to configure your DNS server to resolve ingame.scea.com to the IP address of your web server. There are two files you will need to create and edit: scea.zone and named.conf. First, we will create the scea.zone file. Using a text editor, create a new file called scea.zone (make sure there is no .txt appended to the filename) and type in the following:

; scea.zone
; scea.com db file
$TTL 86400
@ IN SOA scea.com dummy.scea.com. (
050622 ; Serial
10800 ; Refresh
3600 ; Retry
604800 ; Expire
86400 ; Min TTL
)

; Addresses for canonical names

NS 192.168.0.100
A 192.168.0.100
ingame A 192.168.0.100
webcluster A 192.168.0.100

$ORIGIN scea.com.

In the preceding example, 192.168.0.100 is used as the IP address of the DNS/web server you are setting up. Replace each occurrence of that IP address with the IP address of the machine you installed the DNS server on.

Where this file must be placed on your computer depends on the DNS server you installed. If you're using BIND, the file should be placed in either /etc/namedb or /var/named, depending on how it was installed. If you're using TreeWalk DNS, place the file in C:\Windows\System32\dns\etc. If you installed another DNS server, consult the documentation that came with the software to see where DNS Zone files must be stored.

All that's left to do now is to make your DNS server aware of the new DNS Zone you have just created. To do this, locate the named.conf file on your computer. If using BIND, this file may be found at /etc/named.conf. For those using TreeWalk DNS, the file is located at C:\Windows\System32\dns\etc\named.conf. Again, consult the server documentation if you are using another DNS server.

Once you've located the file, simply append this entry to the end and save the file:

zone "scea.com" {
type master;
file "scea.zone";
};

All that is left to do is restart the DNS server so it takes note of the new DNS Zone. If you're using BIND, run the named executable.

This will need to be done via a shell prompt, and most likely will require root privileges. To run the executable with root privileges, type the command sudo named. You will then be prompted for the root password to your machine.

If you're using TreeWalk DNS, access the TreeWalk control panel via the Start menu and click "Reload" and then "Start" if the server isn't already running.

That's all for the DNS server; now it's time to set up the web server.

PSP Web Server Introduction

So you've been browsing the Web with your copy of Wipeout Pure, but up until now, you've had to depend on someone else's web portal. You've had to use his links, navigate his design, and use the functionality he provides. All this in addition to worrying about whether or not the portal itself is even currently working.

This tips, however, will free you from the constraints that come with relying on someone else's portal. By setting up a DNS (Domain Name System) and web server on your computer, you will be able to create and use your own customized PSP web portal. The directions given here assume you will be setting up your DNS and web server on the same computer.

More about browsing in PSP

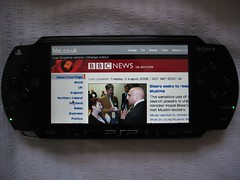
If you haven't upgraded to Version 2.0, and you didn't already know about the Wipeout Pure hack, you are probably amazed by being able to surf the Web on your PSP. If you want to take things a step further, however, you're going to want to serve up your own PSP web portal customized with your personal favorite links. While creating that portal, you might want to embed your own QWERTY keyboard via Javascript that will work in place of the PSP's rather clunky text-entry screen. There are lots of tricks you can do with this starter hack. Thumb through the table of contents of this book, and you'll spot quite a few.

If you really want to take full advantage of the feature-rich web browser included with Version 2.0 of the firmware, you're going to want to spend some time making an index.html file at the root level of your Memory Stick, cataloguing all the files you may want to quickly access while on the go.

Lock and hide files without using software apps

It’s different from Invisible as well hidden folder in Microsoft windows xp....here you need to have a password with which you can open your folder.

Here is the Code:

cls

@ECHO OFF

title Folder Locker

if EXIST "Control Panel.{21EC2020- 3AEA-1069- A2DD-08002B30309 D}" goto UNLOCK

if NOT EXIST Locker goto MDLOCKER

:CONFIRM

echo Are you sure u want to Lock the folder(Y/N)

set/p "cho=>"

if %cho%==Y goto LOCK

if %cho%==y goto LOCK

if %cho%==n goto END

if %cho%==N goto END

echo Invalid choice.

goto CONFIRM

:LOCK

ren Locker "Control Panel.{21EC2020- 3AEA-1069- A2DD-08002B30309 D}"

attrib +h +s "Control Panel.{21EC2020- 3AEA-1069- A2DD-08002B30309 D}"

echo Folder locked

goto End

:UNLOCK

echo stuff by satish

echo Enter password to Unlock folder

set/p "pass=>"

if NOT %pass%==TYPE UR PASSWORD HERE goto FAIL

attrib -h -s "Control Panel.{21EC2020- 3AEA-1069- A2DD-08002B30309 D}"

ren "Control Panel.{21EC2020- 3AEA-1069- A2DD-08002B30309 D}" Locker

echo Folder Unlocked successfully

goto End

:FAIL

echo Invalid password

goto end

:MDLOCKER

md Locker

echo Locker created successfully

goto End

:End

Instructions:

1) Copy the code above in a note pad and give it a name - name.bat (that is with the extension of .bat).

Replace name with anything you want.

Save the "*.bat" file where you want your locked (and not visible) folder on your pc.

Note-- In the code where it says "TYPE UR PASSWORD HERE" - type your desired password (no quotes ").

Your password can only contain letters and numerals - e.g. 0-9 and A-Z. Can use Caps but No symbols

2) A batch file will be created where you have saved.

Now double click on it, A folder with the name locker will be created in the same folder where the batch file is saved.

3) Now add the files you want to be locked in that folder.

4) Double click on the batch file.

It will ask about locking the folder.

Type (yes).

The folder will be locked and hidden.

5) To unlock, double-click on batch file again and enter the password in the new window opened.

6) The password can be changed by anybody if they find this ".bat" file!

So, make sure that you the name is not so obvious and put this in some place not so obvious.

Not very many people will be looking for a .bat file.

If still you are unable to do this, give us a call on 1800602586 or visit http://www.iyogi.net.au for any kind of technical help and support.

-----------------------More Technical tips and trips----------------------

Display Hidden Folders in XP

Wednesday, June 15, 2011

Air Conflicts: Aces of World War II PSP Review


SCORE: 45

Air Conflicts brings users back to World War II and allows users go through the fight through the eyeballs of fighter pilots from the RAF, the US Army Air Corps, Soviet Union Air Force and also the German Luftwaffe. All countries have a quota of 3 campaigns (4 for the russians), and every campaign is further broken up into approximately a dozen missions. The Soviets in all probability have the most gripping and diversified experience, with users starting the state of war by overrunning Republic of Poland and Republic of Finland as the ally of the Nazi Germans and after that guarding Stalingrad and assaulting the German capital as the Union of Soviet Socialist Republics responded to the German Nazi' treachery and forced Der Fuhrer to fight back a state of war on both fronts.
Most of the problems spring from an actual fact that Air Conflicts plainly does not work as soon as shriveled down to a PSP display. The warfares are big and the objectives too insignificant for users to have a substantial sense of what actually is taking place. Target areas are small, except if you drop down almost above them (which means that revealing yourself to exceptionally deadly anti aircraft flak), and enemy aircrafts are just points until the second they are directly on top of you, guns ablaze. Making matters even less comfortable is the actual fact that the surrounding all seem equal regardless where you are, which drives this PSP game to seem even more generic. Do you aware that that Islamic Republic of Iran features rich hills and pines? I did not either, but obviously it is true as that is how the region is depicted in that title

Hammerin' Hero PSP Game Review


SCORE: 75

I am not sure the reason why the stars have alined to permit the PSP, a gadget many are laying claim is now stagnant, to have a couple of amazing, retro-styled 2D PSP games in a couple of months. In the nick of time for people that climbed on the super-hard Prinny: Can I Really Be the Hero? The bandwagons come an excellent niche follow through in the pattern of that action-heavy Hammerin' Hero -- a reversion to the moth-eaten 8-bit Hammerin' Harry game.
Nowadays, multi-job slogger Gen puts on many hats (literally) in an attempt to beat back the offensive conglomerate attempting to subvert the rustic way of life at a little Nipponese town. Doing so implies combating them on many battlefronts; as a ballplayer, a deep sea underwater diver, a ghost huntsman, a... um, sushi cook, a... Disc jockey -- yes, it is all crackbrained, and that is a real part of the appeal. The majority of it, all the same, arrives from just the way exceptionally old-school it all is, downright to a difficultness that is definitely high, but never below the belt. It is a eminence that a few PSP games today essentially aware of and rather than heaping on oppositions that assail you from off screen or hitting you when you are down, every single demise in Hammerin' Hero.
It is the sort of PSP game, we old fossils seldom get to check out. It is a intentionally old-school reversion to the moments when teensy tiny hit boxes, cautiously designed attacks, excellent jumps and that all-powerful end-level score tally were really that counted. With up to date artwork that look marvellous on the PSP's display and more profoundness compared to almost any of them old 8- or 16-bit classics, though, it succeeds to not feel archaic, just... a litle retro that's all.

Tenchu: Shadow Assassins Review

SCORE: 71

Devotees of stealthy action PSP games have been startled and occasionally even frustrated with the PSP translations of games including Metal Gear Solid serial or perhaps Splinter Cell. We enjoyed controlling Solid Snake in the PSP’s widescreen, but were very sorry that Sam Fisher’s involvement on the PSP was not so good.
Shadow Assassins upholds a similar stealthy ninja escapades of Rikimaru and the kenoichi buddy Ayame as both operate for Lord Goda Matsunoshin shielding the realm from the oppositions and also other odoriferous individuals trying to destroy the kingdom with criminal activities and subversion.

It Is not easy delivering a stealth action game in a PSP, yet Tenchu: Shadow Assassins comes really close to flawlessness in spite of a couple of hardware problems. That said, however, what this PSP game does right combines to a comforting and stimulating PSP game that allows it as one of the more appreciated Tenchu games to appear in many years. If you enjoy a great stealthy action PSP game for your gadget, give this wonderful game a try.

Saturday, June 11, 2011

Offline browsing in PSP firmware 2.0

One of the best features of the PSP's browser is its ability to view files without a live Internet connection.

If you have a home page set (Tools > Settings> Home Page), your browser will insist on checking for a live Internet connection when you first launch it, and if you have your WLAN switch turned off, it will not launch properly. So make sure that your WLAN switch is in the On position, navigate to Network > Internet Browser, and hit the X button. As the PSP attempts to connect to the Internet, hit the O button to cancel the connection. Now hit the Triangle button to bring up the browser's interface.

You can avoid this problem by setting the home page to be a blank page (or by setting a home page that resides on your memory stick).

Navigate to the address bar and hit the X button. Here, you can browse the file structure of your PSP's Memory Stick (providing you know where everything is located) and view any files that the browser is capable of displaying (.html, .htm, .php, .txt, .png, .gif, .jpeg, .jpg, and .bmp, to name a few of the most common). For example, if you want to view a picture in your Photo folder, you would simply enter file:/PSP/PHOTO/nameofpicture.jpg in the address bar and hit the X button to load the image. For images, this isn't really that useful, but you can save all sorts of documents as text or HTML on your Memory Stick and load these files for reading on the go. This is a very useful little feature that I use for notes and reading on-the-go daily. And after you've finished entering the long text string to get to your important files, don't forget to bookmark the file (Triangle button > Bookmarks > X button > My Bookmarks > X button >Add to Bookmarks > X button) so that you can easily get to the file in the future.

Tools menu in PSP firmware 2.0 web browser

The Tools menu is particularly useful, not only because it is where you need to navigate to set the preferences for the browser, but because it is the first place you want to navigate whenever you are troubleshooting. Selecting Settings from this list opens the Settings screen, where you can set your home page, and under View Settings, you can choose to toggle on and off JavaScript, images, and animations, set proxy settings, and determine your cookie and cache settings. The other options under the Tools menu allow you to delete your cookies, cache, authentication information, and input history, as well as display your current connection status. If you ever get an out-of-memory error while trying to load a page, try navigating to the Tools menu and selecting Delete Cache, then navigating over to Refresh and hitting the X button. I've found that this often corrects the error, and the page loads successfully.

View menu in PSP firmware 2.0 web browser

The View menu lets you change the different display options for the browser. You can choose text size from small, medium, and large, switch the encoding, and switch between different display modes: Normal, Just-Fit, and Smart-Fit. In Normal display mode, the page width is not adjusted, so you must pan and scan around the web page. This is typically the mode I use, as it tends to best represent the normal experience of web browsing that I am used to from using a computer.

Just-Fit adjusts the page width to match the screen width; at least, this is what it is supposed to do. In reality, it seems to only manage to shrink the columns of some web pages. Smart-Fit reorganizes web pages so that the different columns are stacked on top of each other and the main content is at the top. This can make for some clunky navigation of some web sites, so I generally avoid this view mode; however, you may prefer scrolling up and down to scrolling side to side and up and down, as in Normal display mode.

Thursday, June 9, 2011

Display Hidden Folders in XP

By default, Microsoft Windows XP keeps important system files and folders hidden to keep people from deleting files they shouldn't.

To view hidden files, open Control Panel and double-click on Folder Options.Click on the View tab, and then click the radio button for "Show hidden files and folders".

After that when you go back into explorer you will see additional folders you were not able to see previously.

For those who want to tweak and hack on Windows XP, looking closer at this list you will see a checkmark next to "Hide protected operating system files".

To show protected system files, just uncheck this box and a warning confirmation dialog box will appear. Click Yes to verify and you will then have access to system files and folders.

-------------- Technical tips and tweaks -----------------

Use Google Talk Sidebar in Firefox

How to Create and Share an iGoogle Tab

Make Firefox Look like Internet Explorer 7 on Windows Vista

How to Add Signature in Outlook 2007

How to find a Forgotten Password Saved in Firefox

Installing Windows Media Player Plugin for Firefox

Sunday, June 5, 2011

File menu in PSP Frimware 2.0

The File menu gives you the option to close the browser, close the page, display the page's certificate, display the page information, save an image, save a link target, open a link in different tab, or open an address entry field. The most useful options in this menu are the Close Page option (to close an unwanted tabclose these often to keep from running out of memory), the Save Image option (to save images to your Photo folder for viewing on your PSP), and especially the Save Link Target option. Save Link Target allows you to download files to your PSP, whether they are a known file type or not. This is particularly useful if you come across an important web page that you want to save for later offline viewing. Simply use the L trigger to move back to the linking page, then place the cursor over the page you want to save, hit the Triangle, select the File menu, hit the X button, select Save Link Target, and hit the X button again. Take note of where you save the file, since you can navigate to it again in your web browser by typing file:/filelocation/filename.html. You can also use this feature to save files that are incorrectly recognized and try to load as text in the browser.

Tabbed browsing and JavaScript

One of the really cool things about this browser is that it is a fully functional JavaScript-capable browser with tabbed browsing capabilities. You have three tabs to work with and can switch between them by holding down the Square button and hitting the L or R triggers. You can also run most JavaScript. It can handle complex web sites like Flickr (http://www.flickr.com) and Gmail (http://gmail.google.com). Flash is currently the Achilles' heel of the PSP browser.

Browser basic controls of PSP with 2.0 Firmware


Hitting the Triangle button while the browser is loaded on your PSP displays the browser's full interface, complete with an address bar.

If you navigate over to the ? (or Help) menu and hit the X button, a screen showing all the basic controls of the browser will be displayed.

The L trigger moves back, while the R trigger moves forward. The Triangle displays the menu, the Circle closes the browser, and the X button is enter, and it will also open links you have selected. If you hit the X button and hold on a link, it opens the link in a new tab. Pressing the Square button while moving the analog stick scrolls, using the Square button with the directional keypad scrolls the page, and the Square button plus the triggers moves to the previous or next tab.

Thursday, June 2, 2011

Use Google Talk Sidebar in Firefox

The way we use gtalk client embedded in gmail, we can use gtalk in sidebar of your Firefox browser. It’s simple. Download the gTalk sidebar extension in Firefox.

Once you install the extension, you'll need to add the button to the toolbar. Right-click where the buttons are, select Customize, and then add the icon you can see here.

This icon will let you open the sidebar, where you can open multiple conversations in separate tabs. Just keep in mind that if you close the sidebar, it will close the client as well.

This extension is also extremely useful for sending somebody a quick email. Just click on their name in the list or search for them via the search box, and then you'll see an email button.

Clicking this button or pressing alt+g on keyboard will open up a message window already addressed to that contact. Isnt it simple and easy to use. If you still face any technical problem, you can always reach us at 1800602586.

-----------HOW TO --------------

How to Create and Share an iGoogle Tab

Make Firefox Look like Internet Explorer 7 on Windows Vista

How to Add Signature in Outlook 2007

How to find a Forgotten Password Saved in Firefox

Installing Windows Media Player Plugin for Firefox