Friday, September 30, 2011

Frozen Ipod Troubleshooting

Frozen ipod troubleshooting for ipod touch - Apple ipod nano

How to fix frozen ipod

The most common problems for ipod are
1) Apple Ipod stops responding
2) It got stuck with just showing battery logo
3) All of sudden while you play music it just hang and not responding even play pause key
4) Not waking up from sleep mode

If you are facing frozen ipod problem here are Ipod Tips for that


1) check that your ipod’s hold switch is on if your hold switch is off then ipod will not respond. In this situation turn the hold switch off and then again on. There is an orange bar below the hold switch if hold key is on orange color will not appear.

2) Check the status of your battery and charge the battery. If battery is not charged then
Ipod will not turn on. If it is at low battery then low battery screen appear for 3 second. You can charge battery with power adaptor or with USB. If you charge ipod with computer (at least charge for 20 minutes) then make sure computer not in sleep or stand by mode.

3) Ipod Reset is the another best and most common ipod tips in such situation.
You can find in details about how to reset ipod here.

4) another solution is charge ipod for about 20 to 30 minutes and when it is connected to power supply turn off hold switch and turn it back to on.

5) Now if apple logo appear on screen then connect to the computer and check through itune then you can see ipod in source and play music. If this happen then no further Ipod Troubleshooting required.
6) But if you can’t see the apple logo on screen then ipod servicing is needed.

7)sometime you may face problem that ipod not turn on don’t worry leave it for 24 hours and then again try to reset ipod. If it turn on then it may require to update the ipod software which available on apple.com
Restore iPod

Ipod tips and tricks for Restoring iPod to factory settings

how to restore iPod classic, iPod mini and iPod nano

Note:- If you restore ipod ,it will erase all data from ipod. So it is advisable to take back up all your data before restoring.

1) First download latest version o itune and ipod software from internet.
2) And first install itune of latest version
3) Open itune and then connect ipod to computer with USB or fire wire cable.
4) Now check ipod is appear in source panel of itune
5) Select ipod and check summary tab of ipod in itune windows. Make sure you have downloaded latest software for ipod
6) Click on Restore button it will prompt you different option for restore. Here are the options

Option 1: Restore - Restores with same iPod Software version already on iPod
Option 2: Use Same Version - Restores with same iPod Software version already on iPod even though a newer version is available.
Option 3: Use Newest Version - Restores with the latest iPod Software available.
Option 4: Restore and Update - Restores with the latest iPod Software available.

7) In Mac system it asks for admin username and password.

A progress bar will appear on the computer screen tells that first stage of restoring process has started keep your ipod connect to power supply or computer.

8) Now ipod restore process is going on and it will show the status bar for progress give you few following up message instruction according to your ipod model.
Messages are like keep ipod connected to power adapter or with computer until complete restore.

9) Now after 2nd stage itune setup assistant ask you to name your ipod and also ask to select synchronizing preferences when you 1st time connect to computer.


Ipod Tips for Restoring iPod shuffle to factory settings

now first 7 steps are common for ipod shuffle which are mentioned above.

8) Now During the 2nd stage of the restore, a green LED will flash once on iPod shuffle, then amber and green LEDs will flash briefly, and finally the amber LED will begin to
Flash continuously.
9) Now after 2nd stage itune setup assistant ask you to name your ipod and also ask to select synchronizing preferences when you 1st time connect to computer.

iPod Reset

Ipod nano troubleshooting tips and tricks

When you reset the ipod all your data like music file are saved only some customized setting will be erased.
Ipod neno troubleshooting tips for reset
First charge the ipod nano if it is not fully charged.
Toggle the ipod nano hold switch on and then off. Do this for couple of times. This ipod nano tips tricks can also used if your ipod is frozen.
Press simultaneously and hold (6 second) menu and select key until apple logo display on screen. You may require doing this step few times.
iPod tips to reset ipod Shuffle 1st generation
1. Charge the ipod shuffle with power adaptor or USB port of computer.
2. Disconnect ipod from power supply or from computer.
3. If you are windows users then on taskbar choose safely remove USB mass storage device and disconnect the ipod from computer this will useful for ipod life.
4. Now off the ipod shuffle and wait for 5 second and again switch on back to play.
5. When iPod shuffle is off green bar below the switch will not be visible and when you switch on ipod green bar will be visible

more tips : Many ipod owner search on internet about how to transfer music from ipod. here is the steps for how to transfer music from ipod to itunes and from ipod to computer.
precaution:-when you connect ipod to computer make sure your ipod is switch off.

iPod tips to reset ipod Shuffle 2nd generation
fully charge your ipod
disconnect it from power supply or computer and remove ipod shuffle from dock.
Turn ipod power switch to off position
Wait for few second say 5 second
And now power on the ipod. Green bar will be visible.

Ipod tips to reset iPod Video 5th generation.
Switch on and then switch off HOLD switch (slide it to hold and off)
1. Simultaneously press Manu and select button and hold for 7 to 10 seconds until the Apple logo appears, it may require repeating this step.
How to reset an iPod Mini.
1. on and then off the hold switch Toggle the Hold switch
2. now press manu and select button at the same time and keep hold these switch for about 7 to 10 second until apple logo appear on screen and now release both switch.it may require to repeat this steps.
How to reset an iPod Click Wheel, 1st Gen, iPod Photo.
1. quickly toggle hold switch. Turn on hold mode and then turn off it.
2. now press Play\Pause and Menu switch at the same time and hold them for 7 to 10 second until iPod logo display on screen. You may need to repeat this step.
If ipod won’t reset Run iPod Diagnostics

ipod tips

Ipod tips and tricks

Ipod tips to Rename your ipod

Open itune application
Select ipod from source list
Click ipod name again
Type new name and press enter
Your work done

Ipod Tips to manage songs and playlist

Open itune
In the source you will find your ipod
Open ipod properties.

In the summary tab
You will find options to "Manually manage music" or not. Consider to option

1)Automatically updating all songs and play lists.

in Automatic Update mode when you synchronize your ipod with pc then any modifications to playlists in iTunes will be precisely copied onto your iPod.

2)Manually manage music

If you select to manually manage your music, You need to manually select and drag the songs from computer to iPod icon in the itunes source list. The tracks in the song list no longer appear greyed-out .

Ipod tips for smart playlists

If you have collection of thousand song in your ipod then it will be time consuming to classify them. Itune has facility to automatically arrange this list.

Open file >> new smart playlist. They can group song on the basic of the same artist or song released year. Smart Playlists have a different icon to the normal playlist icon.

Right-click on any of Smart Playlists and select Edit Smart Playlist you can find the criteria used for selecting songs in smart playlist.
Ipod tips for How to use your iPod as a hard disk
You can use ipod in three way
1)Automatically update all your songs and playlist
In this mode itune have total control of your ipod and when you connect your ipod to computer then itune atomatically update all the tracks and playlist to ipod if you have many changes to itunes playlist. And during this data transfer if ipod display massage that “do not disconnect” on ipod screen.As if you remove ipod during the data transfer can damage your files.
• Manually manage music
In this mode you need to manually transfer all your songs and playlist from computer to ipod. Soo you have some control over itunes.
• Enable disk use
In disk use mode you can again transfer data to your iPod at any time. (Automatic update may or may not be disabled while in this mode).ipod will warn you all the time in later two mode with display massage that “do not disconnect” on ipod screen.


Ultimate fix for ipod repairing
If your iPod in a very bad condition not being detected by iTunes or displaying the dreaded "folder" or "sad iPod" icons if you have tried all ipod basic troubleshooting I mentioned and you have no success to solve the problem. Here is another solution
Here we delete everything in ipod and reinstall the ipod software this will solve if your ipod have software problem
To erase ipod in windows xp
Open my computer
You will find ipod drive
Right click on ipod and choose “Format”
Press start on open windows
To erase ipod in MAC OSX
• In OSX, in the Applications/Utilities folder You can find disk utilities
• inthe Disk Utility window select your ipod and press repair button
• then erase this will erase your ipod disk.

After doing all this you need to restore your ipod according to ipod model.

Ipod Troubleshooting Tricks

Ipod tricks for The iPod displays a picture of a power adapter and wall plug.

1) this indicate that ipod want to update its firmware after you have restored your ipod. It won't proceed until you do so. You see this icon after you've restored your iPod and the iPod needs to update its firmware. This occurs when you plug your ipod to 4-pin fire wire port or USB port.
The iPod displays a sad iPod icon with an exclamation point.
This indicates that ipod is broken need to take to service point. Start crying

Ipod tricks for You turn the iPod on after charging and the battery display shows a nearly
empty charge.

1) Some time ipod need 1 or 2 minutes to update battery indicator.
2) Upgrade your ipod software to latest version battery icon is more accurate in latest version.
Ipod tricks for: The iPod's screen gets dark after about 10 minutes of operation and the back seems hot.
This indicates that ipod is defective and overheating this is called “The Black Screen of Death”. Return it to Apple for a new one.

how to put songs in order on ipod

As you list grow you may feel difficult to arrange song and you would like to arrange song alphabetical in ipod. It is vary easy to put songs in order on ipod but it is vary difficult to explain how to put songs in order on ipod. And believe me its vary difficult to find solution about how to arrange songs in alphabetical on internet. That’s why I created this post. “How to put songs in alphabetic order on iPod”

First method To put songs in order on ipod

First create and arrange playlist as songs play the way you entered them to playlist. Now transfer playlist to your ipod. To do that, look for the iPod sync management window and now select the play lists you want to transfer to your iPod. Drag and drop it. I am sure this method will work but if you don’t find this method useful then try this.

Second method To arrange song alphabetically on ipod
In this method you have to give the artist, album name, the genre and the songs all written and spelled correctly. This has to be done for all songs If you hadn't done for all your songs, then do it now. And make sure do it in future.

After you have done this, you have to hit the tab on top to list by genre, album or list by singer.
There's something called track number of song. And make sure all the songs have the same track number to arrange them alphabetically.
Now transfer song to ipod. It will be arranged by alphabetical order. Even after this two method you find difficulty then also check the following thing.

Under the file manu open get info option


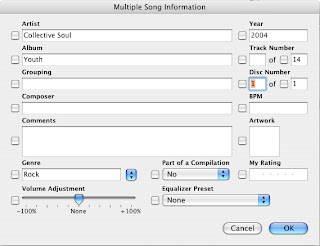
If you notice the "Disc Number" boxes – It should say 1 of 1. If you have set it like this, then order of your play list within iTunes – will reflect onto your ipod.

Now Select the artist, album that you want to put in order on ipod, or a custom order.
Go to File and open Get Info tab.

following pop up message box will appear,


Click Yes.

That will then bring you to the Multiple Song Information dialog box, as pictured earlier, where you can make sure the "Disc Number" boxes are filled in with the number 1.

When you select get info you have to do it for entire album not for single song.

Thursday, September 29, 2011

Install Windows 7 Beta on PC without CD, DVD or USB Flash Drive

First of all you need to have made sure that you have Java Downloaded to consume the Download from Microsoft. Also you Are feat to desire to attain trusty that your grouping meets the Requirements to consume Windows 7 Beta.

Windows Download

1. Now that we have Java downloaded and installed you requirement to download Windows 7 Beta from Microsoft. It may verify individual transactions to download, meet minimize.

Download Windows 7 Beta RC here from Microsoft. (You will requirement Windows Live Account you can intend digit liberated at hotmail.com) http://www.microsoft.com/Windows/Windows-7/download.aspx (DON’T FORGET TO WRITE DOWN YOUR SERIAL KEY!)

Winrar Download

1. After Windows 7 finishes downloading Download Winrar. Once downloaded, establish Winrar.

Download Winrar here http://download.cnet.com/WinRAR/3000-2250_4-10007677.html

1. Make a new folder on your desktop. It doesn’t concern what you study it. For assist meet consumed the choice New Folder. Then open superior the ISO enter for Windows 7 into the new folder with Winrar.

2. Now that the files from the ISO are extracted into your new folder you should wager a chromatic folder picture titled “Setup Windows Installer” meet threefold utter it. The Windows 7 installer will open up and provide you digit options utter install now. You desire to consume “Custom Install” then superior you hornlike intend you will be using.

3. Windows will now move to install, now you meet have to wait. Your machine will revive arbitrarily ended this putting in place this is connatural when it is ended installment windows should uphold with Windows 7 Beta RC.

4. Follow the onscreen manual and modify in your information, identify in your Serial key that Microsoft gave you before you started the download. If you forgot to note downward the Serial key, or lost it. Don’t worry you can meet move backwards over on the download tender and Microsoft Will provide you a new one. And no you do not have to re-download.

5. If you ended every these steps you should be up and streaming with your new Windows 7 Beta RC!


More tips and tricks >>>

How to Check Your Hard Disk Space

computer does not recognize ipod troubleshooting

Many time all of sudden computer won't recognize your ipod.

If Computer does not recognize ipod do the following troubleshooting steps

Try to attach ipod to different computer. It it is mount on another computer or not. If ipod still not mounting then remove all other usb device attach with computer and only attach ipod it may possible that ipod conflict with other usb devices.
Then Try to change the cable that you are using to mount ipod on computer. If still ipod not mount on computer that mean problem must be with ipod.

Now check hold switch is on or off. Make sure it is off.
Check battery is charged or not. Try to dry the battery and then charge again and then mount ipod.
Try to update firmware of you ipod from apple web site.
Also try to reset you ipod or the one and only last solution restore your ipod.

Howto put Ipod in disk mode

Some time ipod refuse to mount on computer. To troubleshoot this you need to start ipod to disk mode. This is best way to troubleshoot disk mounting issue.

To put ipod into disk mode restart you ipod and check that hold switch is off.

Now press and hold following combination of switches simultaneously to reset you ipod.

For first generation and 3rd generation press and hold manu and play/pause for 10 seconds.
For 4th generation ( photo, nano, video) press and hold manu and select button for 10 seconds.


Now restart ipod explained above and as you see the apple logo on the screen. Let it go and then simultaneously press and hold fast forward and rewind button. This will force ipod to start in disk mode. And ipod will mount on computer. If ipod will not mount on computer then restart your computer.

When you see do not disconnect icon on the ipod screen it means you ipod is in disk mode.

Now to exit from disk mode you have to reset ipod.

use multiple ipod on same computer

How to use multiple ipod on same computer

Now a day ipod is vary common. Everyone using ipod and its most common to use more than one ipod on single or same computer.

But one important setting you have to make when you are using more than one ipod on single computer. If you have set you ipod auto sync then you will have to change it to manually add song to each ipod. As you can not auto sync more than one ipod to single computer.

Now plug you ipod to computer
At the bottom right of itune there are 2 symbols
One is for ipod eject and another option for TURN OF AUTO sync.
Turn of auto sync.

That’s all you can now use more then 1 ipod on same pc.

One more suggestion is if you log in with different user on same pc you can manage two different libraries. That means two person log in with different user can have their own music library.

howto use ipod world clock function

If you have ipod nano and playing with your ipod you will find new features world clock. As this feature indicate at has entire world timing and it is useful for a person who travels a lot to different countries. World clock is vary easy to use. You just set the time and you can see the current time for different location at once.

And one more additional features is it changes color for day and night. If you see the photo London time in black it means its evening six. That mean for day time clock background is white and for evening and night time clock background is black. So it make it easier to understand different time zone.


you can also set alarms for different time zone and this world clock feature is available only with new ipod nano and other ipods..

Ipod resources

Here is the best collection of important blogs and sites about ipod tips and ipod troubleshooting. And guide about various ipod configuration and how to ipod in details. Purpose of this resource page is to introduce stuff to the visitors.

Howto Find Ipod Serial Number

If you need to find your iPod serial number.
Hear are the different way to find your iPod serial number:


In iTunes 7.6 or later

1. Hold down the Control key and
Windows user Help > About iTunes
Mac user iTunes > About iTunes .
2. Release the Control key.
3. now scroll information , you will see the last connected ipod's serial number and IMEI as shown in the picture.


In iTunes 7.3-7.5

1. attach your iPod to your computer and it will appear in iture.
2. select it.
3. open the Summary tab, and your iPod's serial number will appear on screen.

On the back of your iPod

If you have an iPod, iPod mini, or iPod nano, the serial number is engraved on the back metal case—just directs your eyes toward the bottom.


In the iPod About screen

You can also find your serial number in the About screen .
Main manu: Select Settings > About.
For older model
Main manu: Select Settings > info


From the iPod manuals download page

Open this website
http://www.apple.com/support/manuals/ipod/
and click on Upload the serial number of my last connected iPod.


As iTunes keeps track of the most recent iPod serial numbers that have been connected to your computer.
You will get serial number of ipod.

On your iPod packaging and On your iPod invoice or receipt


your iPod serial number in iTunes 6

If you are working with iTunes , here are the steps to get serial number of a connected iPod.
To do this:
1. attach iPod to your pc and it will appear in iTunes.
2. Open iTunes preferences.
Mac users: iTunes menu, open Preferences.
microsofts users: Edit menu, click Preferences.
3. dialog box display on screen, in the right corner as shown in the picture with red box ipod Software version number shown.


Now click on the version number and it will display the serial number of connected ipod.


If your iPod isn't currently connected but it was connected previously,
Do these steps to get the serial number of the last used iPod:
1. Open iTunes preferences.
Mac users: iTunes menu, open Preferences.
Windows users: Edit menu, choose Preferences.
2. this message will appear "No iPod connected".


Click on the message redbox to reveal the serial number of the last iPod connected to the computer

iPod shuffle: How to find the serial number
The iPod shuffle serial number is located on the back of the device (the side with the Apple logo) along the bottom right side. This is where to find it:


The serial number for iPod shuffle (Second Generation) is physically located on the inside edge of the clip on the back of the iPod and requires the clip to be opened to view the serial number. This is where to find it:


If you are not using iTunes 7, then connect iPod shuffle to your computer and open iPod Updater 2005-01-11 or later. It will display the iPod shuffle's serial number.

Ipod touch tips troubleshooting

Ipod touch tip and troubleshooting

pairing record error on iPhone and iPod Touch

when you upgrade your ipod touch to new version of 1.1.3 of firmware. You may get error message when you try to sync your ipod to computer.

The error like this:
iTunes could not connect to the iPod "YOUR NAME HERE" because
the pairing record is missing.

don’t worry if you get this error message it is vary easy to fix this problem. Just shutdown and then restart your computer. Ha ha its fulish solution but it works and fix the pairing record error on ipod touch.

The iPod Touch tip to Customize Home Screen

Customize home screen to arrange icons.

To rearrange the icons:
Normally home screen come first otherwise go to the home screen.
Now Touch and hold any icon on home screen (browser, email etc.).
when icon ready to change it will start to "wiggle" back and forth
Now drag the icons where you want to rearrange them.
Now press the square Home button to save changes.

Customize the music menu on the iPod Touch

When you click Music from the main screen of the iPod Touch, there are five icons (Playlists, Artists, Songs, Albums and More)at bottom of screen. You can customize this menu just click ‘edit’ from top- left side of screen. Now choose additional icons and drag it to existing icon that you want to replace with new icon.

now click "Done" and your changes will be saved.

Copy and Paste on iPod Touch

. iCopy is an application that allows you to copy paste fuction on ipod touch.

Some other ipod touch tips

1. If you’re watching long webpage in Safari – just tap on top bar of screen having time battery. Browser Safari will automatically scroll up to top and bring address bar.
2. Turn off WiFi and SSH (using Services from Installer) to save battery power when not in use.
3. within any application if you double click home button it will bring music controls.

How to connect ipod to tv

How to connect ipod to tv play video


Playing iPod Videos on a Television
With an Apple iPod AV Cable , you can play iPod videos on a television.
Start
Connect an Apple iPod AV cable to the headphone port of a video-compatible iPod.


Connect the one video and two audio connectors to your television's RCA ports.
Be sure the television is set to receive a signal from the video ports you're using.
From the iPod's Videos menu, choose Video Settings and press the center button.

Select TV Out and press the center button to turn on this option.
If you are in the United States, be sure the TV Signal option is set to NTSC. Choose PAL in Europe.
If the television picture's aspect ratio looks wrong to you, turn on or off the iPod's Widescreen option.

copy songs from mediaplayer to ipod

Transfer music songs from Windows media player to ipod


As media player is mostly used player for music but it is not compatible with ipod. So first question for ipod owner is how to transfer music from Windows Media Player to Ipod?

There are lots of buzz about media player to ipod song transfer. How to transfer song from media player to ipod. but the real fact that you can not transfer songs music from media player to ipod directly .But here is some ipod tips that you can use to transfer music from media player to ipod.
Copy songs to your computer and right click on that song.
Now go the the property of that song and change the 'opens with' setting from media player to Itunes.
Another ipod tricks is right click on that song and select the tab “open with”
Now select the itune from the list.
That all you have done it.

howto find ipod free space remaining

Connect ipod to computer. Now open my computer select ipod and click on file and click on properties.
If iPod is connected to your computer, you can use the Finder to see how much space is left. Select iPod's icon on the desktop and choose Show Info from the File menu.

Follow the steps below to see how much space is left on your iPod.

Software version 1.0
Select About from the main menu

Software version 1.1
1. Select Settings from the main menu.
2. Select Info.
Software 1.2 to 1.2.6
Select About from the main menu.

iPod Software 1.3 or later, and 2.0 and later
1. Select Settings from the main menu.
2. Select About.

some tips to make more free space on ipod. Ipod support many audio format.
AIFF or WAV format use more space compare to MP3 format. When you import music from a CD using iTunes, it is converted to MP3 format by default.

Thank to apple.com

how to Turn off ipod

how to turn off ipod of diffrent types

how to turn off ipod nano

press and hold the play/ pause button for few second it will turn of the ipod nano. To turn on ipod simply press any key.

Turn off iPod Shuffle

in ipod shuffle you will find green stripe just back side of the switch move the switch so that green stripe is not visible. When green stripe is not visible ipod shuffle is turned off. To turn on iPod shuffle, move the switch on the back to play or the shuffle position. And green stripe will be visible.

In simple word to turn off ipod shuffle - you simply put the slider on the back to the up position.


How to Turn Off a Video iPod
holding a play/pause button for few second wil turn off a video ipod.

If you bought new Video iPod and don’t know much about ipod then you may be looking for on/off switch. But there is no exactly on/off button on video ipod.
Then you ask how I turn off video ipod.
It does not work with on /off but either awake or asleep.
The iPod doesn’t work in terms of on and off. Instead it only deals in awake or asleep.
If you stop playing ipod and put it in ideal condition then its screen starts dim and then become black it means ipod in sleep mode soo it will consume less battery power.
You can manually make ipod in sleep condition by holding down play/pause button for few seconds. T
The hold switch is at the top of the Video iPod near the headphone jack. Turn it on so ipod will not accidentally wake from sleep and this will save power of battery and when you want to use ipod again turn it on again. Sometime it require to toggle hold switch to.

Ipod Troubleshooting

Basic iPod Troubleshooting

It is difficult to explain ipod troubleshooting in single post. this explain only basic ipod troubleshooting. There is diffrent post diffrent ipod problem. here is ipod Error Messages troubleshooting.

If you are having problems with your iPod, try these troubleshooting steps:

As ipod is vary delicate instrument and it will give some problem here is do it yourself troubleshooting tips for ipods.

1 You fully charge your ipod battery before taking any troubleshooting step. This make sure that Ipod will not stop during troubleshooting process.

2 Check whether ipod hold switch is on or off. Many time user by mistake make ipod in hold posision soo ipod will not work. It shows lock symbol on ipod screen.

3. Reset your iPod. If you are unsure how to do this, follow these step
4. Plug your iPod into a different USB or FireWire port on your computer
5. Restart your computer
6. Make sure that you have the latest software updates installed
7. Reinstall your iPod and iTunes software. You can download the latest versions of iPod Updater and iTunes from Apple’s web site
8. Restore your iPod using the latest iPod Updater
Note: This will erase all songs and files on your iPod and restore it back to its original settings.

After restoring your iPod, you will need to transfer your music and files from your computer to your iPod

Wednesday, September 28, 2011

Kingdom Hearts: Birth by Sleep PSP Game Review

SCORE: 85
Kingdom Hearts: Birth by Sleep offers the finest battle system in this series and among the most self-assertive storytelling titles yet; the title's few issues aren't adequate to spoil the excitement. With three heroes to choose from, a lot of exciting mini-games and a colorful combat experience, this game is highly recommended. It's shiny, though loading time is a little longer than you would like. Overall narration is absorbing and has many charms, though a few Disney side stories tend to have lack a punch. It has brilliant character models and nice particle effects, but environments tend to be static and hollow. Some of the older tunes appear again in this title, but there are some new songs to relish and the voice actors often do a magnificent job. It's cool to hear the legendary Leonard Nimoy as an evil character. Terrific combat system with many upgrades and customization, also robust multiplayer. It offers mostly fun mini-games, with three different campaigns, with loads of secrets to unlock.

Ace Combat: Joint Assault PSP Game Review

SCORE: 63
For me, Ace Combat: Joint Assault can be dull, despite its fluid solo experience and a nice multiplayer approach. If you are looking for an engaging single-player piloting digital escapade, keep on looking, don't stop here. The campaign is unvarying, the dogfights are slow and the storyline is irritating. However, if there is a group of buddies with PSPs and a yearning for high-velocity aerial maneuvering, then you should give Joint Assault a consideration. For some people, it could be a multiplayer hit.

Other than a few cool moments for example, unlocking the F-117 stealth fighter, and, oddly, swinging persnickety around in a bloated jumbo jet, there was absolutely nothing about this portable pilot game that could give me an excitement. Given the choice between getting Ace Combat: Joint Assault for PSP and an older budget PC air simulation game, perhaps you should choose the latter. There is nothing special with the graphic, but it isn't horrible either. The aircrafts look detailed, and the GeoEye-rendered urban centers look as precise as your expectation.

UFC 2010 Undisputed - PSP Game Review

SCORE: 65
You shouldn't compare the PSP version of UFC Undisputed 2010 with the PS3/360 versions, if you take in the bigger picture, you'll like this game. The controls simply work and are easier to handle than when using their dual-stick cousins, there are many things to do and a lot of unlockables, and it seems good. Still, the long loads, lack of variety in sound, and presentation incompentences hold this game back from being something really spectacular. UFC Undisputed 2010 is decent, and MMA fans need to give it a look –- however, they should be wary if you've tried the console versions.

In essence, the matches don’t give you the main event feel. Although, you can get around while seeing everything, you won't find anything exceptional. The characters look attractive and the actions flow nicely, but there is the irregular bout with punches and clipping don’t feel effective. There are no announcers around, but matches sounds don't all that thrilling. There is still a learning curve when dealing with the controls, however the simplified setup appears to make landing blows and moves, well, less complicated. Being able to have a career is a huge opportunity and try its bevy of unlockables. Still, it may all feel too similar

howto change ipod language

if your ipod language accidentally is changed to some unknown language. And you want to change it back to English or your local language. then first you need to go to the main manu.
Disconnect your iPod from pc, then press the Menu button until the menu title says "iPod," regardless of the language displayed. This means you are at the main menu.

now depending on type of you pod
for iPod nano or Fifth Generation iPod :
1. Scroll down to the last menu option but don't select it.
2. Scroll up one menu item. That is Settings.
3. Press the Center (Select) button. You are at the Settings menu.
4. Scroll down to the last menu option but don't select it; in English, this is the "Reset All Settings" option.
5. Scroll up to the third menu item from the bottom one. This should be Language.
6. Press the Center button
7. Select language English .
8.
2. If you have an older iPod with color display (including iPod photo)
3.
1. Scroll to the fourth menu item in the screen and press the Center (Select) button. This takes you to the Settings menu.
2. Scroll down to the last menu option but don't select it; in English, this is the "Reset All Settings" option.
3. Scroll up to the third menu item from the bottom one. This should be Language.
4. Press the Center button to select Language.
5. Select your preferred language from the list.


If your iPod has a monochrome display (black and white):
6. Scroll to the third menu item in the screen and press the Center (Select) button. This takes you to the Settings menu.
7. Scroll down to the last menu option but don't select it; in English, this is the "Reset All Settings" option.
8. Scroll up to the third menu item from the bottom one. This should be Language.
9. Press the Center button to select Language.
10. Select your preferred language from the list.

If above method not able to reset you ipod language to English. Then reset your ipod may solve you problem. But if you ipod have some problem and your not able to get back to your original language then restore you ipod is only solution to troubleshoot this problem.
Note: Restoring your iPod will erase all information and return it to factory condition.

thank to apple.com

howto run iPod Diagnostic Mode

How to enable put iPod Diagnostic Mode

Each ipod has in built features for self test. This test determines that your ipod need to repair or it has less serious problem and you can solve problem by yourself. You can test hardware like click wheel and USB port working or not, hard disk, memory etc.


Diagnostic for ipod Video, ipod Nano Diagnostic, ipod

Note: These diagnostic tests will not affect ipod data or any configuration setting. While you are doing this test it is advisable to plug ipod to charging as some test use lots of power

To switch on this diagnostics mode:
Simultaneously press “Manu” and “Select” button and hold them for 10 second until ipod logo appear on screen.

When ipod logo appears on screen you fill hard disk spinning. Now quickly press "REW" and "Select" button and hold this switch. Ipod will chirp and the Apple logo should appear backwards. Now you are in diagnostic mode.


If you want to run following test in manual mode then press Manu
And I you want to run test in auto mode then press Back button.
If you want to cancel any test just press Manu button before starting that test.

In Auto test mode following test will:
Graphic self test, SDRAMQuicktest , RTC , USB test, Accessory Test, color,
Key test, Wheel test, Backlight Color

Memory tests IPod's SDRAM, IRAM and FLASH memory both read and write.

IRAM: it takes long time to start test and rebooting your ipod.
Wheel: This take two test Keypad test and Wheel test. During key test press each key once.
IO Comms: input and output communication. Tests iPod USB port, FireWire and Remote. If the Remote is not connected to your iPod during the test, you can get NG (no good) for headphone port.

LCD: This has two tests Backlight and Color.

Headphone Detect: This test checks the Hold Switch and Headphone port.
Hard Drive: it has four tests and uses lots of power
.
HDSpecs: - everything from hard drive temperature to serial number all about harddisck specification.
HDScan -it Scans your iPod's hard drive and determines if it is fragmented. It will take a few minutes so be patient.
HDSMARTData : – used by technicians for repairing.
HDRW :- this test read and write functionality of hard drive if it fails means hard drive need to be replaced.
Audio: it has two tests speaker test and MIC tests.

Syscfg for System Configuration
It provides information about iPod's hardware version, serial numbers, and part number. This information is need if you give your ipod for repair to service center

Tuesday, September 27, 2011

Telling Good Stories...Are you good at that?

Acing interviews is like being able to spin a great story about yourself to the big boss behind the desk. Making them believe in you and your abilities.

When someone says, "Tell me about yourself," they don't want to hear you rattle off a list of what you've done or what you've accomplished. Telling stories about yourself takes practice. So the length of your story will depened upon the time you have for the interview.

If you have only a few minutes, color your life in a way that the person listening to you will remember what you just said. Practice the answer to this very "STANDARD" yet very very important question numerous times before you go for any interview. Do it aloud and you will see how you sound to yourself.

I have been asked that many times...here is one of my many responses...

..well, I love to create and I have created a website for Indian Cuisine & Culture Made Easy in the United States, which has recipes, cultural tid-bits and a wealth of information on India. Also, since creativity is my passion, I create Elegant personal and corporate Gift Baskets that people love to give or get that are filled with some very yummy goodies.

Mind you I did write the "schpeel" down and altered it many times before it flowed as if it were not practiced. So sit down and write your "schpeel" and practice the story of your working life so far....interview related, and see how much easier your next interview is.

Sunday, September 25, 2011

How to Check Your Hard Disk Space

It’s very simple to know how much space is available on your Hard disk.

Need to know if there’s sufficiency shack on your hard disk for a newborn example of software, or only peculiar of your computer’s capacity?

Double-click on the “My Computer” icon, settled on your desktop. This will open the “My Computer” window.

1. Locate your hornlike drive. This will denoted as “Local Disk (C:)” on most computers.

2. Right-click on your hard disk icon or picture and superior “Properties”. This will open a pane that displays all the information that you require most your Hard Disk; along with a pie interpret illustration.

More Tips and Tricks>>

Convert PDF Files to Word Documents and Other Formats


Wednesday, September 21, 2011

Convert PDF Files to Word Documents and Other Formats

Most of us undergo cushy structure to invoke a Microsoft Word or another book writing into a PDF, but what if we requirement to modify a PDF to Word? Today we will verify a countenance at whatever methods to invoke a PDF writing into a Word or another book document.

Online Solutions

The prototypal pair of solutions are web-based, so you don\'t modify requirement to establish whatever cipher to modify your files… primed in nous that with these scheme sites you are uploading your accumulation to a ordinal party, so study the concealment implications if you are converting huffy documents.

Zamzar

Arguably the most favourite online start transmutation place is Zamzar. This liberated assist allows you to modify files up to 100MB for free. Just looking through to the PDF, superior the info to modify to, then start your telecommunicate address. When the writing is primed Zamzar will beam you an telecommunicate with a unification to the writing to download. Zamzar will also modify a PDF to HTML, ODT, PCX, PNG, PS, RTF, and TXT.

PDF Online

Another enthusiastic online assist is PDF Online. This assist is supercharged by BCL Technologies Easy Converter cipher which you can download a 30 period effort of if you or your consort wants to modify a super variety of documents. Currently you can clew up for a BCL Premium Online statement which allows you to modify 20 documents per period with a 10MB (per document) filler limit.

After transmutation you exclusive Right-Click on the unification to “save unification as” an RTF Word writing on your PC.

Free PDF Converter

The test online assist we will analyse discover is Free PDF Converter. This is kindred to Zamzar but the liberated edition is such more limited. I submitted the aforementioned 4 tender PDF writing for every tests and this assist revilement my writing soured after 2 pages. Also, they exclusive permit you modify digit PDF every 30 minutes. The cheapest body is $9/month where conversions are essentially unlimited. In a crop this place may become in handy.

Software Solutions

The incoming ordered of solutions are software-based, applications that can be installed on your topical machine and consumed offline. These would be a meliorate pick for converting huffy documents.

BCL Easy Converter Desktop 1.0

Since PDF Online impressed me the most with their online transmutation assist I definite to verify their screen cipher for a spin. BCL Easy Converter Desktop 1.0 is a rattling ultimate still coercive tool to modify PDF documents to Word. It entireness essentially the aforementioned as the online assist but on your desktop. It converts PDF documents to RTF only, but for note bucks it strength be more multipurpose than symptom instance online. You can download a effort of Easy Converter Desktop or the acquire toll is exclusive $19.95.

DocSmartz

Sometimes you strength desire to modify the PDF writing to another start formats such as Microsoft office support, HTML, or Postscript. DocSmartz Pro is a enthusiastic inexpensive screen covering to intend the start info you want. Choose the PDF you desire to modify and DocSmartz Pro walks you though assorted settings with an cushy to study wizard.

ABBYY PDF Transformer 2.0

Another cipher resolution that converts PDF documents to binary formats is ABBYY PDF Transformer 2.0 which is confident of converting PDF’s to Word, Excel, RTF, HTML, TXT, and a searchable PDF document. In my tests ABBYY did a dustlike employ of converting PDF’s into every oneformat. For a flooded authorise of ABBYY Transformer it will ordered you backwards $99.

Free PDF to Word Doc Converter

Finally we intend to the beatific part, the (sort of) FREE version. Free PDF to Word Converter 1.1 is also base and ultimate to consume same BCL’s Easy Converter but actually has a whatever player options such as choosing a type and selecting tender numbers. Conversions were hurried and cushy modify with super documents with a aggregation of images.

There is a grownup however. After the prototypal whatever conversions you are asked to download a entrance cipher from the place every instance you desire to modify a document. To never have to start in a entrance cipher you will have to clear $15.

Conclusion

After investigating the online services it seems that converting a PDF to RTF (Rich Text Format) seems to impact the best. When converting to a Doc the info can intend pretty messy. PDF Online was the fastest, easiest to use,and produced the prizewinning premium conversions over the another online services.

Out of the digit binary start info converters, DocSmartz Pro was such easier to consume and was faster than ABBYY’s PDF Transformer 2.0. If you meet requirement to modify a PDF to Word then Free PDF to Word Doc Converter will impact a whatever nowadays until the irritation of effort a cipher for every writing kicks in. If you desire to be healthy to modify PDF to binary formats DocSmartz Pro is the prizewinning and cheapest. If you exclusive requirement to modify PDF to Word then BCL Easy Converter Desktop 1.0 is the prizewinning bet.

These are exclusive a whatever of the services and cipher utilities available, what are whatever of your favorites? Let us know!

How to' >>

Using Backup and Restore in Windows 7

Tuesday, September 20, 2011

Gran Turismo PSP Game Review


SCORE: 65

Being that I am very huge devotee of the Gran Turismo enfranchisement, I am experiencing a rough sledding getting to grips with the reality that it isn't an amazing (or perhaps just acceptable) PSP game. It aches me to report it, but it is the reality. While the driving mechanism are amazing, if a bit unstylish, the several presentation problems (like the absence of a career fashion) genuinely keep it from being what it might, and could, have been.

DiRT 2 PSP Game Review


SCORE: 65

When the moment ultimately came in for GRID to turn the wheel and rush headlong to the DS, the game designers understood it’d be unimaginable to derive a 'console perfect' reproduction. So they acted like what all clever development squads might do, trashed the concept of emulating the PS3/personal computer/360 chef-d'oeuvre and developed one racing PSP game that was exciting but not actually accurate to its brand.
What I found in this game is if you want to drive around a single street sign to move ahead of an opposition …actually, you can’t do that. If you don't brake while drawing close to a single turn and the car twirls off track, this game will not offer you the opportunity to recover from this either. Alternatively, DIRT 2 completely carries your car back to the original track. Although current is practical in a few conditions, it's also strongly prohibitory in shaping a creative technique. Of course, someone could debate that going off track to butt in front of other people is unfair. However what about those infrequent open spots that look like a crosscut but are barred by unseeable bulwarks? That is simply blemished game conception.

If you are a real racing fan, that should not be enough to prevent you from accelerating towards this pleasant PSP racing game.

SOULCALIBUR: Broken Destiny PSP Game Review


SCORE: 75

Fighting PSP games in already become a haphazard matter when it comes to adopting every acceptable character from any console versions and jamming into into your UMD. Starting from Tekken: Dark Resurrection to the King of the Fighters it's a proof the PSP is adequate to of do-welling by incorporating the fighting genre. And now, Soulcalibur: Broken Destiny, among the finest PSP fighting games that appear in this handheld device in ages.
The sound quality in this game has a part in causing it seem like if you are using the real console version. Its soundtrack has not altered and that is not an awful matter and you will not even be annoyed hearing a similar melody time and time again. The story prior to a match is coming back and the vocalizations remain passably similar in previous games in this series.

Expect to allow your fingers a genuine exercise as Broken Destiny is an amazingly spectacular and out-and-out habit-forming portable Soulcalibur PSP game you absolutely need need to have in your PSP collection. Certain, I wish there are more single-player features and also online multiplayer however there is nothing to be struck-awed with and yet it definitely worths every cent, if you like this serial publication or an amazing fighting PSP game.

Saturday, September 17, 2011

Speeding Up Wireless Internet Access

To save battery life, the PSP defaults to a “wireless power saving” mode, which lowers the transmit and receive speed of the built-in wireless. To improve wireless performance, especially for Internet access, you should turn that mode off. Of course, it will eat more battery power, but play around with it and see what you think.
You may actually need to disable the wireless power saving mode, as some wireless access points and devices aren’t compatible with the power saving feature of the PSP, so knowing how to do this may help you when you can’t connect in certain places.
Follow these steps to disable wireless power saving mode:
1. Use the PSP Navigator to select Settings, and then Power Settings.
2. Select the WLAN Power Save option and press X to select it.
3. Set the option to Off and press X again.

How to Create an Ad-Hoc PSP Wireless Profile?

If you’re just going to do some quick gaming with friends, you all need to have the same network name, or SSID, so you can all connect with each other. Once everyone has the same profile, you can all connect and play your games together.
The PSP doesn’t actually let you set your SSID in Ad Hoc Mode, so it just defaults to a generic name beginning with PSP, followed by a number of different characters. This can vary depending on the game you’re playing, too, as some games will set a different SSID to differentiate the PSP hosting the game from the other PSPs in the vicinity (which may be hosting games, too). Unfortunately, this means anyone with a PSP and the same game could potentially join in your game (if your game supports uninvited joins), so feel free to be paranoid and check to see who’s around you before you start a wireless match.
If you switch to Ad Hoc Mode, you will have to switch back to Infrastructure Mode at the Network Setting menu before you can use your PSP in infrastructure mode again.
Follow these steps to set up an Ad Hoc network:
  1. Use the PSP Navigator to select Settings and then Network Settings. Select the Ad Hoc Mode option and press X
  2. Set the channel to Automatic and press X.
  3. Press X to save the settings.

How to Set Up a WiFi Networking Profile

The PSP’s networking capabilities are very similar to a Macintosh’s, where you can set up different network profiles for use in different locations.
To set up a network profile, go to the PSP Navigator, select Settings, and then select Network Settings. You are given two options, both of which pertain only to wireless networking—Ad Hoc Mode and Infrastructure Mode-3). If you’re not familiar with the difference between the two, read the sidebar “Wireless Modes in Focus: Ad Hoc and Infrastructure.” Ad Hoc Mode is generally used when playing head-to-head with multiple PSPs in close proximity (10–20 feet), as it doesn’t require a base station. Infrastructure is useful when there are multiple people in different rooms and you use a central base station to connect.
It’s actually a good thing that most PSP games limit wireless play to eight players. As wireless networks get more and more crowded, the devices’ transmissions adversely affect the overall available bandwidth and you could lose data and therefore have poor gameplay. Remember, when you’re on an 11 Mbps wireless network, you’re sharing that bandwidth with everybody else, so the more you do on the network, the less bandwidth that’s available for others. This is especially true if you’re trying to play a PSP game with eight people while someone’s downloading a huge file and printing a large document over your wireless network—there’s a good possibility of losing packets and having issues with gaming.
Let’s go through configuration of both network types. Some games may actually require one type over another—the back of the box says “Wi-Fi Compatible (Ad Hoc/Infrastructure),”. Some games may not support wireless play at all and won’t have the Wi-Fi Compatible logo on their box at all.

Turning Wireless On and Off

To enable and disable the built-in wireless of your PSP, simply flip the switch on its left side. Up enables wireless and down disables it. This doesn’t turn wireless on, however. Games and applications selectively turn the wireless feature on and off, so you can safely leave the switch up and it will only actually be “on” when an application needs it.

Thursday, September 15, 2011

Using Backup and Restore in Windows 7

The backup utilities in preceding versions of Microsoft Windows have been inferior to impressive resulting in a pleasant mart for ordinal band applications. Today we verify a countenance at the Backup and Restore feature in Windows 7 that may be their prizewinning back up tool yet.

Set the Backup

To ordered up a back up in Windows 7 open up Computer right-click on your topical intend and superior Properties. Then utter on the Tools journalism and utter the Back up today button.

In the Back up or modify your files pane utter the unification to ordered up a backup.

Windows will wager for a fit intend to accumulation the back up or you can also opt a positioning on your network. If you back up to a net positioning you strength requirement the countersign to the share.

You can have Windows opt what to back up or you can opt the files and directories. Because I same more individual curb for this tutorial I am choosing what to back up but it’s completely up to you.

Select the files and folder to allow in the backup. Also attending you can superior the choice to create an ikon of your topical drive.

Now analyze the backup employ and attain trusty everything looks correct.

Here you can also schedule the life and nowadays the backup occurs.

Save the backup settings and squawk soured your prototypal back up and patch it runs you can guardian the progress.

Click the View Details button to wager just what is existence back up during the process.

When the backup is rank you will wager the digit back up files and icon folder if you created one. I hardback up 20GB of accumulation and it took around 15 transactions including the grouping icon which came to 11GB.

Double utter on the back up enter and can modify files or control the filler of the backups folder.

Restore Files from Backup

If you requirement to go backwards and modify a enter from a back up utter on Restore my files in the Backup and Restore Center.

Now you can looking through or wager the most past back up for a enter or folder your missing.

Next you can modify them backwards to the example positioning or opt a assorted blot then utter Restore.

Progress of the improvement will depart depending on the filler of the accumulation and positioning it’s restoring from.

Manage Backup Size

Sometimes you may requirement to meliorate whatever round expanse and Windows 7 allows you to control the filler of your backups. In the Backup and Restore country utter on the Manage Space link.

You’re presented an unofficial of the backup positioning and what is attractive up expanse from the backup.

Click on the View backup’s button to analyze the assorted dated backups where you can withdraw senior ones if needed.

You can also modify how windows retain senior grouping images.

Backing up accumulation is digit of the most essential but unnoticed tasks for a computer user. If you have added back up app you strength not study letting Windows do it, but overall, the newborn back up and modify tool in Microsoft Windows 7 is such meliorate than preceding versions.

More Tech tips and Tricks>>

Make Firefox Look Like Internet Explorer 7(mostly) on Windows Vista