There are a number of ways to get the scoop from industry insiders about how to break into their career including: joining professional associations, attending networking events, going on information interviews, or asking for advice on Internet message boards. However, if you are hoping that everyone who works in the industry will welcome you and be willing to help, you may be disappointed. Instead of getting fabulous career advice or job leads, you may be left feeling discouraged about the career and thinking you should consider doing something else with your life. Think again. If you are left feeling less than excited about a career after speaking with someone working in it, you are probably talking to the wrong person. Here are some reasons an industry expert may not be helpful to newcomers:
They want to feel special
Many successful people got where they are today because of their talent and effort. When asked how they did it, however, their story may sound like the one that parents used to tell about walking in the snow for miles every day to get to school and home again - uphill both ways. In other words, they make it sound much more difficult than it is. And while it's possible it really was difficult for someone else, you might have what it takes to achieve success in your chosen career more quickly. Few people will tell others that it's easy to break into their career or that almost anyone with determination can do it, even if that's true. By saying that it takes a rare ability or many years to succeed in a career, someone who is already working in that career validates themself and what they have achieved. Keep this in mind when speaking with someone working in the career, and don't say you hope to get a job like theirs right away. If you acknowledge their success and show respect for their achievements they may be more willing to assist you.
They are struggling
Someone who is struggling in a career may have spent years in the profession without achieving the kind of success they had hoped for. This type of person may try to "help" you by pointing out the "reality" of the profession you want to work in. They will tell you that at least 80% of those who enter their field will drop out or never achieve great success. But that's true for the vast majority of careers. In a recent issue of Harvard Magazine, it was reported that the average person will have six different careers in their lifetime, which means the average person will leave five careers. Why let that stop you from following your heart now? Another reality is that virtually every career - from acting to real estate - has only a few people who reach the top. It is insulting for someone to assume you will not be one of the successful ones. However, someone who has not made it to the top themself after years of struggle simply may not be able to see how a newcomer can. If you can overlook their discouraging attitude, this person may actually be able to help by filling you in on industry jargon, types of employers, and other career information. Just don't waste your time trying to convince them that you will succeed where they haven't.
They have a scarcity consciousness
People with a scarcity consciousness believe there will be less work for them if more people enter the profession. They see newcomers as potential competitors and will do what they can to discourage others from entering the field. The moderator of a message board for one career said in response to our recent posting that if everyone who wanted to enter the career actually did so, "it would stop being a fab job for everyone else as there would be very few who could ever make a living doing this." Fortunately, there are people in every industry who have not only achieved success, but are willing to help others do the same. As Mark Twain said, "Keep away from people who try to belittle your ambitions. Small people always do that, but the really great ones make you feel that you, too, can become great."
I think this article makes you realize that ll the advice out there may not really be helpful.....especially if it is coming from a person who wants to climb the same ladder you are !
Monday, January 31, 2011
How to find a job in this tough economy?
How to find a job in this tough economy?
Finding a job in a booming economy is easier than the economy that we are in today. When things look down and no one seems to be hiring that is when you need to take a harder look at your options, your training and try to reinvent yourself in 3 ways.
1. Try to take the classes or courses that will enhance your resume
2. Try to connect with as many colleagues and former employers not only though networking sites but in person
3. Look for jobs in the most unconventional places like Twitter and Corporate Facebook pages.
You will be surprised as to the difference you will make in the way you feel and the results you will get when you do all three.
Here are a couple of links that will help you do just that
10 Top ideas to get a job in this lousy economy
Books on jobs in a bad economy
Sunday, January 30, 2011
10 Steps To A Successful Interview
- Arrive on time.
- Introduce yourself in a courteous manner.
- Read company materials while you wait.
- Have a firm handshake.
- Listen.
- Use body language to show interest.
- Smile, nod, give nonverbal feedback to the interviewer.
- Ask about the next step in the process.
- Thank the interviewer.
- Write a thank-you letter to anyone you have spoken to.
I hav found that although this sounds simple it is important to think about these things before hand.
Learn about yourself by taking a personality tests
Considering a career change? If so, you might want to take a test or two to determine what career is the best fit for your type of personality. Some tests are free others have a fee. But if you are serious this might be a good start to finding out about yourself.
The top-rated career tests, like the Myers-Briggs Type Indicator, the Keirsey Temperament Sorter and the Strong Interest Inventory are available online.
Myers-Briggs Type Indicator
http://www.humanmetrics.com/cgi-win/JTypes2.asp
The Keirsey Temperament Sorter (KTS) is a self-assessed personality questionnaire designed to help people better understand themselves, first introduced in the book Please Understand Me. KTS is closely associated with the Myers-Briggs Type Indicator (MBTI); however, there are significant practical and theoretical differences between the two personality questionnaires and their associated different descriptions.
http://www.okcupid.com/tests/take?testid=10802373878010974519
There are fees for some of these tests, but, there are also a variety of quick, simple tests like Color Quiz from http://www.colorquiz.com that offer instant results and doesn't cost you a penny.
LiveCareer.com is also a good one and it's easy to use. There are a series of questions that asks you to select what you like the most and least amongst 3 things. When you're done you'll instantly be provided with a great deal of insight on yourself and the environments you thrive in, as well as the kind of jobs, careers and activities you're suited for. You might be surprised. It's fun, incredibly accurate and no-cost to you. Give LiveCareer.com a try today.
Also try Monstor.com's Your Perfect Career Quiz
http://tools.monster.com/perfectcareer/
Get the pop up of vista calendar by single keystroke
Yes, that’s true and quite simple as well. You can get the popup windows vista calendar using the keyboard and by just assigning it a single keystroke.
Press Win+B, then Left, then Enter just to get a pop up of the calendar through keyboard. We know it’s a long procedure. Don’t worry, we have a shortcut for this as well. We can assign this to a single hotkey script (any one of them from F1 to F12).
AutoHotkey Script
To use this feature, you have to install AutoHotkey. What we will do is assign F4 key to send keystrokes instead of having them to do it manually. Now in order to do that, create a new file names calendar.ahk and then paste the following code in it.

#InstallKeybdHook
#Persistent
#HotkeyInterval,100
SetKeyDelay, -1
f4::
{
send, {lwin down}b{lwin up}
sleep 10
send, {left}
sleep 10
send, {enter}
Return
}
Now save the file and double click it to launch it.
Now By pressing F4 only you can get the pop up of calendar. If you want to close the script out, there's an icon in the system tray.
More on Tech tips and Tricks>>
Spyware Protection Software - Windows 7
Upgrade Your Live Bookmarks with LiveClick
Turn on Remote Desktop in Windows Vista
Saturday, January 29, 2011
Text to Speech Software
After you've picked out a text that you'd like to listen to, it's time to convert that document to MP3.
Now, if you've picked out a particularly long document, such as the aforementioned Ulysses by James Joyce, you will most likely need to break the text up into separate documents to be made into separate audio files for manageable listening. You could either follow the natural structure of the book, separating the document into individual chapter text files, or do something more arbitrary, like breaking the document into separate files every 3050 pages.
Once you have your documents ready to go, you need a tool to convert them to MP3 format. A quick search of VersionTracker (http://www.versiontracker.com) will turn up a variety of shareware and commercial titles for Windows that will convert text files to audio files. If you conduct the same search on the Mac OS X end of things, you'll find several freeware titles in the mix. This is because Mac OS X has integrated text-to-speech support built into the OS. Here's how you can convert text to speech under Windows, Linux, and Mac OS X. Your end result will be an audio file that you can convert as described in the next section.
If you are on Windows, use a third-party text-to-audio program such as VoiceMX Studio (http://www.tanseon.com/products/voicemx.htm), load the text, and generate your output file (in the case of VoiceMX Studio, you'll get a .wav file). Next, convert the file to MP3 as described later in this hack, then take the resulting file and drop it in /PSP/MUSIC/ on your Memory Stick to listen.
Get the Text
Why buy audiobooks for your PSP when you can make your own?
You like books, but you don't particularly like the idea of reading your books on your PSP's screen. (If you do want to read books on your PSP, make sure you check out "Use Your PSP as an E-Book Reader" and "Create Your Own PSP E-Books".) You've been considering buying some audiobooks and listening to them on your PSP, but you'd rather spend those hard-earned dollars on games for your PSP. Why not simply make your own audiobooks for the PSP?
Don't worry. I'm not suggesting you sit down and read James Joyce's Ulysses out loud while recording it to MP3. Instead, just grab the text of Ulysses from Project Gutenberg (http://www.gutenberg.org/) for free and have your computer read the text to audio files.
You can get the text from any plain text file you have lying around, so don't be afraid to take that business report your boss wants you to review, convert it into plain text, and change it over to audio. Since the PSP is a recreational device, however, I am going to assume that you are looking for some actual reading entertainment.
If that's the case, a wide variety of options are readily available to you via the Internet. Both Project Gutenberg (http://www.gutenberg.org) and the Electronic Text Center at the University of Virginia Library (http://etext.lib.virginia.edu/) freely offer a variety of literary titles that have fallen out of copyright and entered into the public domain. The text section of the Internet Archive (http://www.archive.org/details/texts) contains texts that have entered into the public domain and others that have been released under Creative Commons licenses or are free from any sort of copyright. The Creative Commons web site itself features a text section (http://creativecommons.org/text/) that regularly highlights texts that have been released under Creative Commons licenses.
In addition to these resources, you can easily copy and paste the text of any web document into a .txt file, or even use an online RSS feed reading tool like Bloglines (http://www.bloglines.com) to display your daily dose of news items on one web page where you can select all, copy, and paste into a .txt file.
Additional Music Tips
If you are on a Mac running OS X 10.4, make sure you check out "Automate Mac OS X File Transfers" for instructions on writing an AppleScript to automate moving your tunes to your PSP. If you're savvy in other scripting languages, you may want to look over that hack, as well, for some ideas for your own automated script.
If you're running Version 2.0 of the firmware and you want to take full advantage of your networked music collection, you'll want to create a Music page that contains an index and links to all the files within your PSPMUSIC folder. This will allow for easy picking and choosing of songs you want to grab off of your network for on-the-go listening on your PSP. Why not build the same support system for a few videos, too?
Also, if you are homebrew savvy, make sure you check out some of the homebrew MP3 players available for the PSP.
Thursday, January 27, 2011
Music Download to PSP

I'm about to provide you my easy and simple formula for setting up your best music on the PSP. You need just a couple of steps and it's a breeze if you the technique.
- First of all you have to obtain a CD ripper and while you're at it I'd unquestionably get a PSP video converter. A CD ripper allows you draw music (rip) of your CD's that you own currently. The PSP video converter will allow you rip and change video file to watch on the PSP...so you are able to see and hear to movies and songs, cool heh!
- Load up the CD and run the CD ripper choose the song you wish to play on your PSP and click the "extract and encode" to PSP.
- If you already own songs files on your personal computer then all you have to perform is click "add" from the CD ripper or PSP video converter.
- Be sure on all the steps above, you choose the "PSP" format.
- How to download or download your songs to PSP? Just plug in the PSP to the personal computer with the USB cable, and duplicate your MP3 file(s) into "H:PSPMUSIC" where H: would comparable the hard drive of the PSP.
That's it. It's really easy to play songs on the PSP!
PSP 3000 Vs PSP 2000 Slim
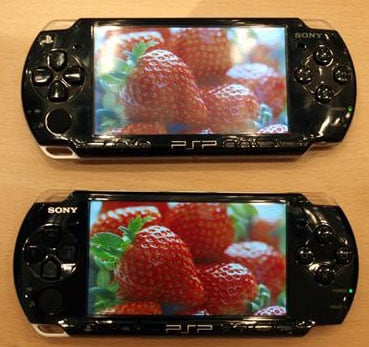
 The freshly issued Sony PSP Slim 3000 has triggered quite a controversy amidst recent PSP users who bought the Sony PSP Slim 2000 model within the last a couple of months. It's not even been a entire year after Sony loosed the PSP Slim 2000, with its niftiest advantage being the capability to link up to a TVset with AV output. A lot of people are disputing that Sony's latest release to its handheld family line shouldn't even be regarded an upgrade of the present model. Let's go for a detailed investigation on the features of the PSP 3000.
The 3000 was revealed at the gaming conference in Leipzig. The model has the perfect equal proportions as its brethren, the Slim 2000. Even so, there were a couple of enhancements. Sony put on the PSP 3000 a brand-new anti-glare display, which is thought to make using the PSP while outdoors a little more tolerable. This brand-new LCD display also provides a wider color pallette than the earlier units, which equals to a clearer, crisper image. Along with this brand-new display, Sony gave a integrated microphone to the 3000, which will permit a lot of individuals who own access to WLAN hotspots spread around a big city to employ the PSP as a phone-like gadget with the integrated Skype software system.
Along with those hardware enhancements, the Slim 3000 also provides a couple of aesthetical enhancements as well. The 'HOME' key no longer survives, as it has been substituted by a PSN key. It acts precisely similar as the earlier key, but rather gets the Playstation logo rather than the word 'HOME'. Also, the groomed aluminum ring which was sported on both the PSP Fat, a new call for earliest PSP, and the PSP Slim has been supplanted with a more refined and slenderer chrome ring. The boundaries of the PSP 3000 have also been polished a little .
On the whole, if you are already a happy PSP 2000 Slim user, you might prefer to skip over this enhancement as the anti-glare LCD screen is only the major enhancement if you find yourself using it frequently while outdoors. However, if you are anticipating buy a PSP, the 3000 is a good choice.
Should you upgrade to PSP 3000?
 The Sony PSP 3000 is Sony's latest progress in mobile gaming. The 3000 is for sure an enhancement from earlier PSP types. Immediately you notice that the color seems crisper and clearer. Occasionally in earlier types, when you entered a low-light location inside the game it got difficult to notice and move your way around inside the game. The sony PSP 3000 also boasts Skype, and integral mike to further enhance the PSP in internet gaming. The PSP also has an excellent game list with a lot of of the popular titles from the earlier playstation PSX games and also brand-new titles. A lot of of these titles also provide artwork that are brilliant to titles ready for the Nintendo DS.
Although the 3000 is unquestionably a progress in the proper direction, that doesn't imply that the system is without flaws. Within graphical extreme actions while gaming, the system frequently shows scan lines and sometimes has shown a few hiccup while it processes what is passing on. The LCD screen also has troubles of its own. If you can actually polish off every of the fingerprints the LCD screen seems to draw in, you then need to be concerned about the glare. I do not believe anyone is certain why Sony Is not utilizing glare resistant displays with their PSP's, as it has been one of the largest complaints during the PSP production.
Finally, if you have a PSP already, it is likely not meriting the upgrade. If you're thinking purchasing a PSP, the 3000 is the great model presently for sale.
Prinny 2: Dawn of Operation Panties, Dood! - PSP Game Review
 SCORE: 74
Starring an adorable demon penguin called Prinny (the same character in Disgaea series). Prinny 2 put you on the boots of a nervous hero who has the task of regaining a stolen panties. His adventure is challenging filled with a few tragic, terrible deaths.
The gameplay is a platforming, with Prinny running from one stage to another, and face a difficult boss as a conclusion. He can slash stuff and dash with s few knives while performing some "hip pound" moves, to stun his opponents.
If you want your ass get kicked, Prinny 2 is for you. This game is a platforming equivalent to the serious strategy game you find in Disgaea and it will make really busy. Unfortunately, frequent deaths can make gaming experience a little tedious at times. But if you love extreme challenges, it would be fine. But for a mere mortals like us perhaps a more forgiving 'baby mode' is already adequate.
A Space Shooter For 2 Bucks! PSP Game Review
 SCORE: 83
With so many games for PSP today, you can't buy a game from the name alone. For example, a name like "Halo" won't give you enough clue on what you'll get. But now with a name like A Space Shooter For 2 Bucks!, you can't help to get curious.
It is only 54 Mb in size to download to your Playstation Mini, but it offers a plethora of quality along with good story-line. The game is full with a comical and very light-hearted affair that puts a smile on your face.
This game is a really complete package. The experience you'll get is worthwhile, challenging, lengthy and fun. The fact that it is only $2, a dirt cheap offering for such an awesome title. If you're looking for things that can eradicate your boredom. don't look much further. The answer is here!
Angry Birds- PSP Game Review
 SCORE: 72
Angry Bird is an exciting game, which promises you bursts of quick actions. The core of the game is easy to understand, destroy structures and evil pigs in it using a slingshot. The projectile? Of course, birds! It's all about, point, shoot, obliterate things and have fun.
Unfortunately, visually, the game is somewhat barren, not much going on the screen, although you can get sharp graphics and solid framerate as result. Sometimes, when those birds hit the structure, you'll get stutter and an overall slowdown. The game is sold for $3.99, significantly more expensive than the iPhone version, that is available for $.99 and it has more levels that the PSP version.
There is no denying this game is really exciting, but should have smoother action, better price and sharper visuals to ensure more polished results.
Wednesday, January 26, 2011
how to unlock ipod screen
how to unlock ipod screen lock
Unlocking ipod nano, ipod shuffle, classic and ipod video without software and code.iPod nano, Second Generation, ipod touch, and 5th gen Generation iPod (iPod with video) includes Screen Lock code of 4-digits. This code is used to unlock ipod screen lock. In this post I will guide you how to unlock ipod without screen lock code software.
About Screen Lock Security
First how to configure screen
Go to the extra manu then
Extras --> Screen Lock

Then set combination
Now set code for screen lock
You can use Previous/Rewind or Next/Fast-forward button to scroll through numbers.
1. When you get the desired number, press the Center button to confirm your choice; the second number will then be highlighted.
.when you enter the last digit, you'll be returned to the Screen Lock menu.
Now to Locking Your iPod
1. Select Extras > Screen Lock > Turn Screen Lock On.
2. iPod displays a "Please remember it!" message in the Screen Lock menu; select Lock to lock your iPod.
3. Once ipod locked, it displays an Enter Code screen. and a key icon in the upper-right corner that indicate you your iPod is locked.
Unlocking iPod
You can unlock iPod in one of two ways:
• Enter the combination code of 4 digit to unlock the iPod. If you enter wrong code combination, the digits onscreen flash red.
• Or Connect iPod to the main computer you use (computer with which iPod synced with), and open iTunes. Now disconnect the iPod from the computer, it will be unlocked.
Unlock ipod without combination code
Now if you forgot you combination code then in this case you have to restore your ipod to factory setting. Important note :-when you reset your ipod, it this will erase all data from your iPod. You need to add your song and data again.
When you need to enter your screen lock code.
When You force iPod to sleep When you wake it, the Enter Code screen appears.
How to add Screen Lock to the Main Menu
If you use Screen Lock frequently, then it’s nice to add screen lock to main manu.
Just open Settings > Main Menu, then select Screen Lock to change its status to On. Screen Lock should now appear in the main menu.
• iPod goes to sleep by itself
if ipod remain inactive for more then 2minutes , iPod will go to sleep mode automatically. When you wake it, its ask for screen code.
how to download convert video from youtube to ipod
how to download convert video from youtube to ipod
This post about how to download or get videos from youtube to your ipod or how to convert or put videos from youtube to your ipod.
There are many useful video on youtube and you like to put youtube video on ipod .But ipod play only MP4 format and youtube play FLV format. You need to convert youtube video to mp4 format to upload it on ipod.
There are two part
Part 1 of converting youtube video to iPod mp4 forate
Step 1 go to youtube.com and Copy the URL of your video which is shown in red box it will look like this: http://youtube.com/watch ? csfdsx67
Step 2 open this website: vixydotnetslashflv_converter. It's an online FLV converter.
Step.3 Paste your youtube url name in the input box and choose “MP4 for iPod/PSP”. Then click on start button.
.Step.4 you will get download link for mp4 file which is compatible with ipod. Click the download link to download file and save it on your computer.
Part 2 Transfer files to iPod
Step.1 Connect your iPod to PC, launch iTunes
Step.2 browse the mp4 file you have downloaded, add it first to itune library. Now if you have auto sync then it update ipod and add video to ipod or if it manually manage ipod then select the mp4 file from library and drag and drop to ipod. You can rename the file if you want.
ipod error messages
ipod error messages and troubleshooting
this is about ipod errore message and steps to troubleshoot these error. I suggest you to read basic ipod Troubleshooting. Ipod is new device and there are many unknown error messages like “ipod cannot be synced, An unknown error has occurred”, ipod 1418 error or ipod 1429 error and it make user frustrate. ipod error messages whether it's ipod mini or ipod touch or ipod shuffle this is actually communication problem Some error are vary simple and easy to rectify here is solution foripod Error 1415, 1417, 1418, or 1428: it also display message that
“Cannot restore or update iPod in itune 7 or later”
Where this problem occurs :-
If you are using itunes 7 and you are updating or restoring you ipod., you may got some error message saying "An unknown error has occurred" it also followed by error number 1415, 1417, 1418, 1428 or 1429. this problem are common for itune u or later with ipod.
Solution
1) try to use different usb port or first remove any other USB Device that you have connected to the computer (don’t remove usb keyboard or usb mouse ). And then try different USB Port.
2) update your itune to the latest version or download the latest version and do fresh installation.
3. Try connecting your iPod to a different USB port and restore.
4) If you are using microsoft Windows operating system, then try to update your usb driver or reinstall Windows USB drivers.
If you have ipod shuffle then you need to use ipod reset utility to restore ipod.
how to ipod lcd replacement instuctions
for first 10 steps of ipod lcd repair
11. Lift up the LCD screen. Now careful LCD screen is |  |
| 12. taken out the ipod LCD screen. |  |
| Now insert new LCD screen ribbon cable into the connector of main board, and lock the black tab of ribbon cable |  |
| Now remove the protective film (which is used to avoid scratch in packing of LCD screen) from the LCD screen. |  |
| 15 . Slide the LCD screen back on to the main board and you you need to follow reverse steps as while you have open the ipod |  |
| 16. Carefully push the main board back into the case.17. Push the battery where it was. How to replace Nano battery. |  |
| 18. Reinsert the 3 screws,be sure one with the coarse thread goes in the middle, and the 2 with fine thread go near the bottom. |  |
19. Make sure all the tiny metal tabs on the case are pushed down so |  |
| 20. Make sure hold switch is aligned with the case, then snap the iPod together. |  |
ipod lcd repair screen and changing
do it your self ipod lcd repair and screen replacement instuctions. here is steps for ipod nano screen repair ( back plate lcd) but this steps is common for other types like 5th generation or 5th gen.
Insuction for how to replace ipod lcd screen. Steps for ipod lcd replacement are common for almost all type of ipod ie 5th generation or ipod nano(back plate lcd).This step by step guide will walk you through a simple procedure to replace your iPod Nano 1G screen. The LCD (screen) or liquid crystal diode screen needs to be replaced for any number of reasons, the most common, a cracked lcd screen, blinking screen, dark or dead iPod screen. The good news about this particular type of broken iPod is it is a relatively simple and inexpensive matter to do this screen repairFirst read the steps carefully and when you understand everything then only try this it is vary easy to repair lcd screen.
1.first turned off your iPod and insert one nylon tools(as shown in the |  |
| 2. Remove the back plate and set aside |  |
| 3. Now keep the battery aside, DO NOT cut the wires of battery |  |
| 4. Unscrew the 3 small screws (2 with fine thread and 1 with coarse thread) these screw are fixed on the main circuit board. To remove one of the screws, you may need to peel back a bit of protective tape |  |
| 5. Lift up the end of the main board about 1/4 inch |  |
| 6. Insert a small flat-head screwdriver pull/ pry up the front of the board with care. The LCD screen is held with adhesive on the back side of the board(see the photo) and it will pull away. Be careful do not scratch the inside of the LCD screen. |  |
| 7. There are 2 clips on the LCD screen which attach the bottom of the LCD screen to the main board. Unlock the clips away from the main board. | 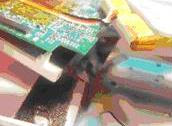 |
| 8.Now Slide the LCD screen towards the top of the iPod. | 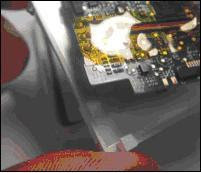 |
| 9. carefully keep all the open ipod parts together! |  |
| 10. Lift up upper body plate as shown. |  |
Continue step 11 for how to ipod lcd replacement instructions |
Tuesday, January 25, 2011
Howto replace install iPod Nano battery yourself
How to replace your iPod Nano battery yourself.
ipod battery replacement how to install and replace ipod battery for ipod nano. step by step guide to change or removal of battery to solve battery problems. proceduce for battery replace is simmilary for diffrent type of ipod like ipod mini ,name or shuffle 2.
Requirement for battery replacement:
2 nylon tools. Never use metal tools they will damage your ipod case. Before doing this first read this post carefully and study the photos and then start opening ipod when you have enough confidence.
| 1. first power off your iPod |  |
2. Hold the iPod flat, with its face up, and insert the blade of the round-handled tool (green tool as shown in the figure)between the metal back and the acrylic lip of the iPod, a few centimeters from the top right side of the iPod, this will create space to insert another tool |  |
| 3. now Insert the other tool and rotate it as inserted round the edge of the iPod so this will separate metal back and upper body. NOTE: iPod may not separate easily. Keep trying |  |
| 4. flip the iPod over so the metal back is face up. 5. remove the back cover. 6. Now battery is connected by 3 wire which are soldered to the ipod. Cut the wires(by knife or scissors) connecting the old battery to the iPod. Make the cut closer to the battery. 7. and remove the old battery |  |
NOTE: now you need to connect new battery with ipod. That means you need to connect three wires (most probably color of white, orange and black color wire) of new battery with three wire to ipod. You need to strip off the wire use stripper and be careful do not cut the cable. For newbie – you strip some wire and twist them together. I feel that for most people, the stripping-and-twisting method is less risky than using a soldering iron. While twisting the cable just match the same colour of cable and twist them. Put a bit of ordinary scotch tape around each pair as shown in the picture. Also make sure all exposed wire is covered with scotch tape. While other way of connecting three cable is soldering. If you have the right tools and is comfortable soldering very small electronic parts. You can try soldering. | |
| see image |  |
| see inside of ipod |  |
| 11. Lay the wires flat on the main board, make sure none exposed parts of the wires are not touching the main board. 12. Align hold switch of the ipod with the case, then snap the iPod together. |  |
| 13. Now fully charge your new battery before using it. Turn on your iPod. You have replaced your battery do it yourselft ipod repair. |  |
how to Transfer Music from Ipod to Computer
download transfer music ipod to computer pc itunes
Easy free way for how to tranfer music songs from ipod to your computer or itunes. Best post for how to get songs from ipod to pc. this method is same for all type of ipod whether it is ipod nano, touch or shuffle to copy music. This post help to transfer music from ipod to pc or iture.But if you want to download songs to ipod here is the way how to Download Music to Ipod.As a new to ipod there are lot of question and problem about how to transfer music from ipod to computer and itune. For this you need to understand how ipod store music and this will help you to take back up of your music library if your computer get crashed.
1. First connect your ipod to computer and avoid itune autosync.
2. to avoid auto-sync, press shift and ctrl key of your keyboard when you are connecting your ipod to computer.
3. Hold shift and ctrl keys and open itunes (normally itune will open automatically when you connect ipod).
Don't let go of Shift+Ctrl.
• Wait until the iPod shows in the Source list under itune devices (it take sometime to show ipod in device of itune while, but don't let go of Shift+Ctrl)
Note: itune ark one pop up message to choose an existing library or to create a new one. Click on Create a new one so that it can just open.
Once it shows up, close iTunes.

Now you can find ipod into my computer as a Removable Disk usually drive E:, F: or G:). As ipod is shown as a drive to your computer. It may possible that some folder are hidden into ipod so you need to unhide them by following steps.
Go to tools > folder option then click on view tab > choose show hidden files and folders and click ok.
2. Now find your songs on ipod and copy them to some folder on your computer hard disk.
•Look in the iPod drive, and open a folder called iPod_Control
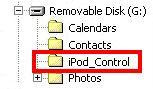
• There is one music folder. Insider music folder many folder file named as fOO, FO1 so on. Tip:- To check the original name of the song and file just mouse over it.
o If you want all the data from ipod then copy whole music folder and If you want only some files then select those individual files and copy them.
Note: All the hidden files that are on your iPod are playable on iTunes once you transfer them to your computer's iTunes.
• The files copied have unintelligible four-letter file names. To reveal the names of the songs and other data tags, add the files to the Windows Media Player or iTunes libraries or switch to “Tiles” view in Windows Explorer. Rename the file if necessary.
The transferred music will be playable without any restrictions if the songs are ripped from CDs. If the songs or videos are bought from the iTunes music store, they will play in iTunes after you have “authorize” the computer. To authorize, try playing a purchased file. It will prompt you for your iTunes username and password. Up to five computers can be authorized at any one time.
Now import folder to itune music library.
• Open iTunes and click on File > Add Folder to Library.
• Select the folder you want to import and click OK.
o This will take some time and it may make your ipod hot while copying.
Advice: Set itune to manually manage your iPod. This means you will have to drag-n-drop new stuff onto the iPod yourself this will good for newbie to ipod.
How to Download Music to ipod
how to Download Transfer Music to an ipod
This post about how to get & put songs music on to an ipod. This help to solve your problem for how to import export music from itune / computer to an ipod or how do you download transfer music to an ipod. But if you want to transfer music from ipod to computer. Here is the way how to Transfer Music from Ipod to Computer.
Most common problem for new ipod user is how to put music onto ipod. So I created this ipod tips to solve this problem. Windows media player is not able to upload songs to ipod. You must use Apple iTunes to get music onto your iPod. Windows Media Player can see the iPod as a hard disk. But not able to copy upload music from pc to ipod.
The steps to put music onto an Apple iPod with itune.
When you plug ipod to your pc first time through USB, you might get this pop up message. If you have already installed itune than go to step 1 down this page.
You need to restart your computer to install ipod and then the next time you start up, your iPod will not generate any messages of this nature.
You need to install itune on your computer if you have not installed itune. You can simply go to apple.com/itunes to download the latest version. It also comes with ipod CD.
The next step is to launch the iTunes program. And it will recognize the ipod that you have plugged in
It shows one message to give name to ipod, You can stick with the default name for your device or give name to ipod.
I also uncheck "automatically update music" because I like to control what happens to my iPod manually.
When you're done with this configuration step, click "Next" :
register your iPod, or just click "Finish".
Step 1
Now, finally, you can see iTunes and also your ipod inside your itune:
Click on whatever name you've given to your own iPod, and you'll see your music list, which is completely blank:

Now click on the "Library" link on the left column and you'll see what albums or music you’ve copied into your iTunes library. Or click on the "Browse" button on the top right (it looks like an all-seeing eye) and a new panel will show up with lists of songs, artists and albums.
Now select the song you want to put on to your ipod. then dragging and dropping that onto the name of the iPod on the left side panel of your itune. Now your song are copied to ipod.
Now you can eject your iPod and start enjoying the music player.
What motivates someone to buy something?
If you are in Sales then that is something you ask yours self everyday.
Yes, you are trained by your company and are a real good talker.
However traditional sales people force feed their own reasons and do not focus on uncovering what the prospect is trying to overcome, improve or eliminate by buying sooner, rather than later. Prospects really do not want to think about anything, they actually want time to "compare". Compare your features and benefits with that of their current vendor or other competitors trying to get in on that business.
Quite often in the eyes of the prospect your features and benefits are not much different from their current vendor or others competing in your field. Hence price becomes a front end and back end obstacle as they focus on YOUR reasons (features and benefits), not their problems and negative effects that are already costing them time, energy and money by not using your product or service.
So the simple trick to to LISTEN first and reiterate what the customer just said. Listen and then suggest ways to make LIFE EASIER for that particular problem !
You will be the best sales person. Don't forget to close the sale ! i.e Asking for the Money and their commitment to buy.
Monday, January 24, 2011
Making the web work for you...Work The WEB !
In order to make the web work for you when you have lost your job or are thinking of quitting !
Make the web work for you by WORKING THE WEB ! Here are 3 points to ponder and work on !
Make the web work for you by WORKING THE WEB ! Here are 3 points to ponder and work on !
- Start a blog that "glorifies your skills" Toot your own horn, no one is going to do it for you cause you know yourself the best !
- Use CraigsList for finding a job in your city, town. Look in the classifieds or make your own ad and show that your skills are available.
- Use www.Ladders.com for professionals that are looking for executive positions. Make sure you look at the resume keyword list, which is like an SEO tagging of your resume. This will help your resume pass through the first level of approval, which is usually scanned by a computer.
Dell Support-How to use dell printer.
The Dell printer is a comprehensible product suitable for office / home purposes. As an supplementary advantage persons with very basic computer skills and minimal computer experience can operate it with no difficulty.
Steps to use dell printer :-
To get started with the Dell printer you will need following contents :
• Few sheets of paper, A4 size
• A paper document, e.g. a certificate or a page from a newspaper/magazine
• A few transparencies
• Photo paper
Using the printer in order to take printouts of documents you should know some common things :
To load the sheets of paper :
• Place the paper against the right side of the paper support with the print side in front of you, and the top of the paper feeding into the paper support.
• Squeeze and slide the paper guide to the left edge of the paper.
To load transparencies:
Place the transparency against the right side of the paper support with the rough side facing you.
• Click Properties to change the setting of printer.
The Print Properties dialog box displays.
• On the three tabs along the left side (Quality/Copies, Paper Setup, and Print Layout) of the Print Properties screen, confirm the selections.
• Click OK or Print.
Thus you know how to use the Dell printer , hopefully you will be able to print important documents and store them as soft copies in your computer now. dell support is the common technical support from iyogi technical experts from where you can take help 24 x7.
Using PSP as MP3 Player
Once you have your music on your PSP, it's time to listen. Here's a quick overview of the PSP's controls and functionality as an MP3 player.
To keep your music organized into albums, all you need to do is keep a group of audio files in a single folder by the name of the album placed within /PSP/MUSIC/ on your Memory Stick. The preview image associated with the Album folder will be taken from the image associated with the first file in the list of tracks contained within the folder.
Unfortunately, the PSP can only see folders one level deep here, so you cannot do things like create a folder called The Beatles, which you then fill with separate folders for each of The Beatles' albums. So, if you want to categorize by artist, make sure you keep all the song files within that main artist folder, rather than embedding folders within folders.
Navigate to Music Memory Stick and hit the X button to see a list of all the songs and albums located inside your /PSP/MUSIC/ folder. The folders will be listed alphabetically, followed by an alphabetical listing of any lone files in this root Music folder. Select the album you want to listen to and hit the X button.
A list of songs will appear, as you scroll through the different songs, you will notice that certain bits of metadata associated with the song files will be displayed, including the name of the song, the artist, and any album artwork associated with the song file. As with all the other files on your PSP, if you select one of the tracks and hit the Triangle button, a menu will appear on the right side of the screen with options for Play, Delete, or Information. If you select Information and hit the X button, the full list of all metadata associated with the track will be displayed, including the title, artist, album, genre, size, date and time it was updated, Length, Sampling Frequency, and Codec at which the track was compressed.
Otherwise, simply hit the X button to play the song.
Once the song is playing, you have a variety of options. If you hit the Triangle button while the song is playing, the control panel will open, displaying all the available controls.
If you are running a previous version of the firmware, some of the controls discussed in this section will not be available to you, although many of them will be identical.
The controls available in the control panel of Version 2.0 of the firmware are Previous Group, Next Group, Previous Track, Next Track, Fast Reverse, Fast Forward, Play, Pause, Stop, Group Mode, A-B Repeat, Play Mode, Clear, Display, and Help. Selecting the Display option adds an overlay along the top of the screen with the name of the track in the upper-left corner and the number of the track next to how many tracks are in this group in the upper-right corner of the screen. Selecting the Help option (the question mark) will display the basic Music Help screen . This screen shows you all the basic controls on the PSP for navigating through your songs. The L trigger goes to the previous track or the beginning of the current track, the R trigger goes to the next track, the O button stops play, the X button plays, the Start button either plays or pauses the track, and the left and right buttons on the directional keypad rewind or fast forward the track.
The Group controls all have to do with different albums or folders you have placed inside /PSP/MUSIC/. A-B Mode lets you select first an A point in a track and then a B point in the track, which will continue looping until you choose Clear. The Play Mode control lets you choose either Repeat One, Repeat All, Shuffle, or Repeat Shuffle, and if you toggle the Group mode selection, all of these settings (with the exception of Repeat One) will use all the files in your MUSIC folder rather than just the songs in the current album folder. The other options available in the control panel are mostly self-explanatory.
Firmware Version 2.0 and Music Playing
If you are running a PSP with Version 2.0 of the firmware, then you can download music from the Internet directly to your PSP's Memory Stick. This is particularly useful for grabbing new music and podcasts from various web sites while you're on the go and connected to a wireless network.
To do this, simply launch the web browser by navigating to Network Browser on your PSP, and hit the X button. After your browser launches, navigate to a page that contains links to audio files in a PSP-compatible format. Unfortunately, the PSP cannot handle compressed files, BitTorrent, or WMA (Microsoft with DRM format)unless you are running Version 2.6 firmware or laterso the files will need to be in uncompressed and unprotected MP3 or AAC format. When you click on the link to the corresponding audio file, an overlay screen will pop up asking whether you want to download the linked file. Hit the X button, as shown in.
If, for some reason, the PSP doesn't recognize the file type and tries to open the file as a website, cancel the loading of the page (hit the Triangle button and then select Cancel) and then go back to the original page (by hitting the L trigger). This time, place your cursor over the linked file, but instead of hitting the X button, hit the Triangle button and navigate to File, then hit the X button. A menu will pop up. Select Save Link Target from this menu and hit the X button.
Another overlay will appear asking for confirmation of the location where you'd like to save the file and the name you would like to give the file. If the location did not default to /PSP/MUSIC/, select that field, and hit the X button to select this folder (or a subfolder inside the MUSIC folder). Feel free to change the name of the file to something you will recognize. Just remember to keep the proper extension at the end of the file. If the file you are downloading is an AAC file, go ahead and change the extension on the file to .MP4 so that your PSP will recognize it.
After downloading the files, hit the Home button on your PSP to exit out of the browser. If you hit the button by mistake, you can either hit it again or hit the X button to return to the browser. Navigate to Music, select Memory Stick, and hit the X button. You should see your freshly downloaded audio files in the list of available tracks.
This method of grabbing songs can be particularly useful for serving up songs from your networked music collection on your home network. All you need to do is set up a networked folder containing any music files you would like to have ready for your PSP, then direct your PSP's web browser to this folder. For example, if your computer has an IP address of 192.168.1.4 on your local network, and you have a folder called PSPMUSIC that you have set up to be available to other computers on your network, you can launch the PSP's web browser and navigate to http://192.168.1.4/PSPMUSIC/nameofthesongyouwant.mp3 to download that song file. Consider building a music index page that links to all these files.
If you've installed Version 2.6 of the firmware, you now have an option called RSS Channel under Network. Now any RSS 2.0 feed containing embedded MP3s can be subscribed to through the PSP's browser, and all the songs on that feed can be streamed to your PSP over a live Internet connection through the RSS browser interface.
Sunday, January 23, 2011
2 Very Important Tips For Starting A Business in Your Home
For more and more people, home is not only where the family is - it's where the business is! I have ben doing business for the past 12 years from home and I love the flexibility and convenience. During the last 20 years, large numbers of people have chosen to market their skills and talents from home. Recent studies estimate that as many as 20 percent of new small business enterprises are operated out of the home, and this trend is growing. Many home-based businesses are even started on a part-time basis and then expand into full-time businesses as the market for the business develops and grows.
Why a home based business?
People are attracted to home based businesses for many different reasons.
They include:
- Experiencing the personal satisfaction of making their own decisions
- Expressing their own ideas and being their own boss.
- First have a mission statement or vision for your business.
- Make a business plan. Every business should have a business plan, including a home-based business.
The best place to get started with that is the Small Business Website.
http://www.sba.gov/
They have detailed instructions on how to get started in your state. With references to laws, policies and procedures.
Saturday, January 22, 2011
Zombie Tycoon PSP Game Review
 SCORE: 58
The content of Zombie Tycoon is unquestionably an attracting one. As an ambitious, demented scientist with no view in morality, you command a horde of zombies while attempting to control the whole world with only your shambling, groaning legions. As a huge fan of zombie films, I at first believed Zombie Tycoon, as an exciting, real-time game title. However, Zombie Tycoon does not come close to this expectations. Rather, the gameplay gives you with a mediocre gaming experience that has a few baffling design defects.
Zombie Tycoon is an easy 55 MB download. The earliest issue you will get with it, though, comes up before you have even queued up for downloading the game itself. Gamers curious in buying the freshly introduced Zombie Tycoon may notice that the cost is a surprising $7.99. However, should be appropriate for such a small program. As you can finish the 50% of Zombie Tycoon in just a couple of hours. Zombie Tycoon has an exciting aesthetic, a lot of details and a realistic control outline. However the interface has complex issues. A very sensitive camera, discouraging AI and a barbarous lack of checkpoints (play for 15 minutes, make a single small slip and start all over again) make this game more of a baffling frustration instead of a refreshing RTS.
Army of Two: The 40th Day PSP Game Review
 SCORE: 52
The risk in delivering a title from a full-size console to a handheld game is that important attributes can get lost quickly. A few capabilities can be restricted, while other features are modified or entirely removed to fit inside less powerful systems. The most crucial matter is: how do these modifications influence the whole gameplay? In Army of Two: The 40th Day, those changes aren't for the better. Literally giving up the franchise's cooperative focus, the light-weight variant deteriorates into an inferior action game.
The 40th Day's setting is in Shanghai as in a number of days as Salem and Rios run missions in their own private soldierly company, TransWorld Operations. These people accept a quick agreement for an immense payday and do not expect much trouble in achieving their jobs. As they complete their mission, Shanghai is attacked. Rios and Salem must stay alive to find out who is behind this. The PSP edition adopts the console story faithfully and even changes much of the talks. Even so, the sense of pandemonium is totally missing on the little display; the roads appear too cramped and the devastation you see looks insignificant. Consequently, it does not feel like the whole city is crashing down all around you, and there is no a torrential adrenaline rush after outliving the combats.
Sloppy action episodes, brain-dead AI and narrower game capabilities absolutely throttle the ported Army of Two: The 40th day. Although the title does boast morality episodes, acceptable talks and a few terrains to go through, the execution is so elementary and unvaried that the entertainment is entirely nonexistent. It's well worth some exploring, even so spare yourself – and your friends – from the mediocre experiences.
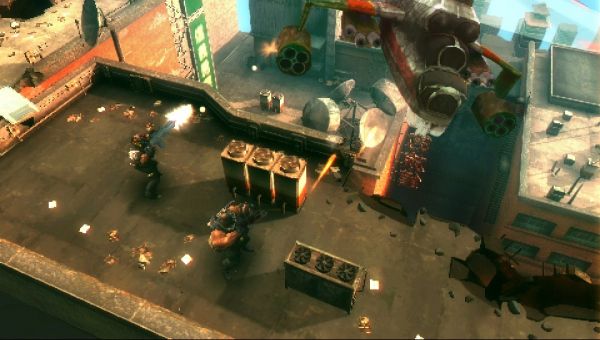
Mytran Wars PSP Game Review
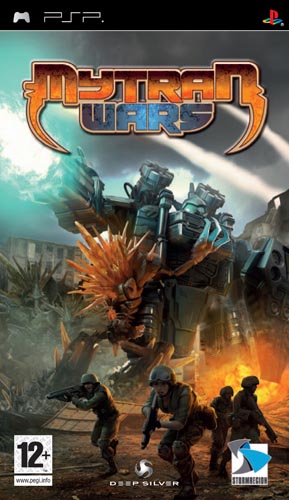 SCORE: 56
PSP strategy genre is frequently took root in the fantasy culture, particularly when it comes to those strategy-RPG hybrid. With dragons, mages and knights dominating in this genre, and a gun-toting mech could be thought as freaky. This is a kind of typical, however, in Mytran Wars, a relatively unknown game of Sony PSP. In the title, you play one of two playable races and you wage a fierce war on grid based environment with a wide range of sophisticated armaments and extraterrestrial technologies. It might seem like a wonderful time, however Mytran Wars sustains from various problems, both technical and mechanical, which can prevent the game from being a little more than a second-rate affair.
Mytran Wars starts with a company, known as the Kondor Corporation and it wages an space invasion to a cryptic planet of Pythar. An intelligent youthful Eli and his lady friend/guard Rachel are onboard one of the initial spacecraft to Pythar with the purpose of prospecting the Pythar for valuable resources. The mech leader for the expedition, Loki, isn't as kid-glove as our planet hopping pair and stays faithful only to the chairman of Kondor Corporation: Alexander Wolfe
Mytran Wars gives you a classic strategy experiences with a lot of tech trees, complex mission objectives and an exciting premise, however this game suffers from awkward processes, cumbersome unit handling and the art/literary genre that seems like an amateurish feat. Put differently: buyer beware!
Friday, January 21, 2011
Spyware Protection Software - Windows 7
I tried downloading Windows 7 from Microsoft’s website…but thjat was not a success. So, Finally I decided to take cd from my friend who was lucky enough to get it. I installed it on my pc and it is running perfectly fine. Everything is ok..but the most important thing which I would like to share with you all (specially Windows 7 users) is computer security. Be careful and don’t forget to put security on it may be Norton, McAfee...or another which one you prefer. But don’t forget to disable the other one which is running. For Computer security is really very important, I installed Windows 7 and after doing that, my first thing was to make it secure and downloaded Norton on my pc.
Here is the list of some of spyware protection software which are compatible with Windows 7.
Windows Defender
Windows Defender is provided by Microsoft itself and it is a anti m
alware utility which was in Windows Vista and now in Windows 7. Make sure that you disable it before you run any other anti-spyware package.

Ad-Aware
Without any doubt, we know Ad-Aware is the most popular and effective anti spyware application which will work very effectively.
Anti-Malware Suites
There are number of suites which are compatible with Windows 7 like
Ø Norton antivirus 2009
Ø Kapersky antivirus 2009
Ø Avast antivirus
Ø AVG Free
Spybot Search & Destroy
This also works well with Windows 7, it has always worked perfectly with me…without any problem you can easily install it and update it...But don’t forget to disable the previous anti spyware program before running a new one.

More on Tech tips n tricks>>
Upgrade Your Live Bookmarks with LiveClick
Make iGoogle Your Startup Page in Microsoft Outlook
Subscribe to:
Comments (Atom)