Computer optimization is the tuning up of PC to get better performance. Performance of your computer system depends upon the memory available. There had been instances when system does not perform properly if the RAM of the computer is low. But sometimes users face problem even when the system has abundant RAM and Processor. The reason is hidden in the bad sector of the hard disk. It usually happens when the system is getting older. We can do the computer optimization and bring the sluggish computer performance to brand new with simple tips. You must be familiar with SCANDISK or CHKDSK utilities software. It will clean the bad sector of the hard disk and create the extra space or memory. Alternatively you can make use of third party software RegCure to do the computer optimization. It will scan and clean registry too.
Above mode of computer optimization will also fix basic issue of Windows known as blue screen of death.
Sometimes we get frustrated with the some application files. We are not able to terminate them. They in turn degrade the system performance to a considerable level. For the purpose, Windows presents a wonderful tool, task manager. To access the task manager hold down ctrl + alt + delete at the same time. Under the task manager option, you have the view of all the running programs, you can scroll down the desired one and choose to terminate it. However it is a system application you need to click on "Processes" tab, and select the application and click on “end process.” This is the perfect resolution to get rid of non-responding program and do computer optimization.
DLL Error is a regular error of Windows. It happens accidently when file with the known extension get deleted. Now, you can attempt for computer optimization with the reinstallation of your system application. Alternatively you can also search for the missing file on the web and install it. There are authentic sites and resources on the web that house DLL files and allow free download.
Saturday, December 31, 2011
Ipod Tips And Tricks
Ipod Tips and Tricks - Ipod Troubleshooting guide
This blog provides ipod tips and tricks, Apple Ipod Troubleshooting, How to restore ipod and how to reset ipod touch. Ipod tips for neno, shuffle and many other video ipod tricks for troubleshooting.
First and biggest problem iPod won't start up.
Ipod Tips to troubleshooting ipod won't start
1) first before starting troubleshooting fully charge your i pod.
2) secondly and most common mistake is - User by mistake make i pod in hold position and so it will not work so make sure hold switch is off. And if hold switch is on then you will see lock symbol on screen. soo move hold switch to off position. If it shows hold switch is off even then toggle hold switch on and off for couple of time. If remote control plugged into it make sure that its hold switch is off as well.
3) if you can mount your ipod on your computer then restore it with latest software updater according to your model. You can find latest software on Apple website. To start ipod restore process read this post about how to Restore Ipod. I will explain this in details vary soon.
Note :- If you Restore ipod all your data like calendar, music and contact will be erased. Soo take back up before restoring.
4) if it wan’t charge or you are not able to charge it, make battery completely dry. Take out battery from i pod and put outside for 24 hours so it will dry completed and again fully charge the battery.
5) if it is 18 months old and you have used it extensively it may possible that battery is completed dead.
This Ipod Troubleshooting tricks will solve almost all problems in most off the cases or else contact technician for repairing.
Ipod Tricks - iPod doesn't mount or not appear in itunes
1)ipod will not be recognized by low power USB port so make sure to plug in usb2.0 port or fire wire port.
2) it needs all the power a fire wire port can deliver soo if it is connected with chain of fire wire devices it will not get required power and soo it will not appear in itune.
3) reset your ipod I have explained it in last post how to reset ipod.
4)If you are using mac system then restart pc while holding a shift key of keyboard this will disable start up items and if ipod respond to this treatment should be restored.
5) for first three generation i pods hold next and previous button and for mini and fourth generation play and the Select button to place the iPod in Disk Mode. If ipod mount only with this disk mode then it should be restored.
Update : many people search on google and yahoo how to transfer music from ipod to computer, pc or itunes. Here is steps for transfer music from ipod to computer and how to transfer music from ipod to itunes.
Ipod Tricks for The iPod displays a folder with an exclamation point when it starts up.
1) fully charge it it may possible that ipod is confused by some process.
2) make sure it is updated with latest version of software which is compatible. An incompatible software may cause this problem soo restore your ipod.
3) If it is formatted with some windows or mac disk utility which are incompatible .if you have done this then restore ipod with latest updater available on apple.
4) If none of this ipod tricks steps work that means your hard drive is dead try diagnosis your hard disk with diagnosis test or contact service center.
Ipod Tricks for The iPod displays a battery with an exclamation point.
1) make sure you are charging from working power source. It will not charge if it attached to sleeping computer and also USB 2.0 connection won't charge a third-generation ipod.
2) your ipod locked up then try to unlock it by resetting. For first three generation ipods simultaneously hold Menu and Play button and for forth generation and mini press Play and Select button for about 7 to 10 seconds.
4)if it does not charge even you plugged it with power receptacle for longer time then try to use another cable as damaged cable also prevent it from charging.
5 if none of these treatments work that means ipod battery is dead
Ipod tricks for The iPod displays the image of a spinning disk and magnifying glass.
1) this indicate that it performing disk scanning test this icon appear in first three generation ipod, not available in mini and fourth generation ipods. If you don’t want to perform this test reset your ipod if you like to complete the scan then plug ipod for charging as this test takes lots of power and take long time about 15 to 20 minutes to complete.
These Apple ipod tips and tricks are common for diffrent types of video ipod, ipod touch or shuffle.
Friday, December 30, 2011
Arrrrghh... my PSP is dead!!!
You were trying to play Tony Hawk's Underground 2 Remix on the PSP, while actually skating, and now you're left with a broken PSP. This hack will walk you through what can be done with your shattered PSP, as well as how to recoup as much of the original cost of the PSP as possible.
You're past the denial stage where you sat rocking back and forth in the corner of your room, cold and alone for hours, clutching it close to your chest, repeatedly switching it on and off, removing the battery, replacing the battery, plugging it in, hoping that suddenly your PSP would turn back on. You've followed all the recommendations in PSP troubleshooting in this blog. You took it to a friend skilled in the art of soldering. He opened up your PSP, gently reconnecting all the aged connections, perhaps even replacing the USB port. You tried new batteries and even an odd voodoo ritual that you discovered online. Nothing has worked. You've finally come to grips with the dreadful reality of it all: your PSP is dead.
Although everything has seemed hopeless during your futile attempts to resurrect your PSP, don't throw that PSP away in frustration. There are several different things you can do with it, and this blog will discuss some of the possibilities.
How to Put the Buttons and Shell into Place?
You're almost there! Try not to jump ahead and insert the battery just yet. Honestly, it is all downhill from here. The figure in previous post provides you with an illustration of where to insert the final screws.
Here's how to wrap things up:
Here's how to wrap things up:
- If you took the left and right trigger buttons out, now is the time to put them back in.
- Insert the circuit ribbon connected to the LCD buttons into its slot on the right side of the PSP.
- Lay the button strip onto the LCD and click it into place.
- Carefully clean off any smudges on the LCD using a soft cloth.
- Lay the PSP top onto the device and apply pressure to snap it into place. Be sure that the bottom button strip lines up.
- Flip the PSP over onto its back and insert screws 1, 2, 3, 4, 5, 6, and 7.
- Finally, insert the Memory Stick and battery/cover back into the PSP.
Images of Playstation 2 Are Revealed

There is talk about PSP 2 again today. The next handheld console from Sony, with some new pictures. Good as usual, Sony has not confirmed anything at all. In my opinion, the PSP 2 looks really too much to a PSP Go which had made a monumental flop . It also looks a bit too similar with the forthcoming Playstation Phone , the Sony Ericsson phone. I think we should wait a bit more news in the design of the console. But this is only my humble opinion.
Who's That Flying?! - PSP Game Review
 SCORE: 79
Who's That Flying?! casts players as the member of a Council that specializes on Space Justice -- a band of superheroes that are tasked with helping a planet from any type of dangers. You are Earth, and you are on test after a few monsters known as Ravagers who popped up during your watch. The levels are played as trials. The game is pleasurable, funny, and attractive. The story mode may feel a little boring as each urban's three levels feel too similar and dragged slightly, but that's only a part of the game. The Infinity Modes and challenges offer quick doses of actions that speed up the gameplay well and give you stimulating objectives. It's simply a sleek game for your PSP.
Knights in the Nightmare - PSP Game Review
 SCORE: 83
This is a fairly fine-looking game, with appealing looking 2D sprites and well depicted character portrayals. This is rather standard fare for a games that is developed by Sting and in fact looks slightly better than the Dreamcast version released in 2009. Audio also appears immensely improved due to the additional space offered by a UMD/installation process, but occasionally it can get a little disorganized since all actions on the battlefields are followed by some forms of commentary.
Developers have done a marvelous job in porting this game to the PSP. The control arrangement works out properly using the analog stick for the pointer while the stylus has similar function the Dreamcast. Gameplay is satisfying and does an amazing job of bringing excitement to the PSP, sound feels a tad cliché but still works out fabulously. Gameplay is entirely tolerable in both marathon sessions and small doses, especially once the central points of story get rolling. If you love Disgaea or others PSP strategy RPGs. I highly advise you to buy Knights in the Nightmare.
Thursday, December 29, 2011
PC Gaming Computer
PC gaming computers are well compatible for running high resolution interactive games. These are equipped with advanced Video card and larger amount or RAM to provide enhanced performance to the computers. Now gaming has become possible on the laptop too, hence user can keep themselves intact with their favorite games while they are mobile.
Here I would like to concentrate on some wonderful PC gaming computer. First have a glance at the laptop industry.
Widow WGMI-1SG210@ $2, 199.99
This PC gaming computer is equipped with latest Intel® Centrino® 2 processor for superior speed. Intel® Wi-Fi Link 5300AGN Wireless Card would assist in fast downloading of any game from the website. Associated with GeForce GTX 260M graphic card and PM45 user will get crystal clear clarity. On the new purchase user will get next generation Windows 7 platform. With WGMI-1SG210's 15.6” full 1080P HD widescreen with LED-backlit display technology you would be able to experience brilliant color contrast. In addition presence of DDR3 1066MHz will give your system a cutting edge in terms of performance.
Widow WGMI-1SG200 @$2,799.99
This PC gaming computer is about to make your crazy. It has been shipped with incredible Windows 7 home premium platform which is a legend of Microsoft. It has been powered with Intel Core i7 Mobile 720 Processor and exclusive 1080p HD LED Display to make your gaming live and enthusiastic. With the best NVIDIA CUDA technology you would be able to run your game smoothly.
Now go through some giant desktop series which has changed the gaming definition.
Widow WGMI-1NG 740@$489.99
You are going to powered with Intel Pentium Dual Core E2180 Processor and ATI Radeon HD 3650 512MB Video Card for getting better experience of games. Presence of nVidia 7050 Chipset will give Stunning look to your computer screen with better color contrast and high resolution. Induction of 2GB DDR2/800 Dual Channel Memory (2x1GB) would help user to perform other task while playing games. This legendary PC gaming computer has Western Digital 500GB SATA-II Hard Drive to help you to keep bulk of computer games and other software.
Wednesday, December 28, 2011
3 small tips on Sony PSP
 Do you have and enjoy a PSP? Do you maintain it properly? These are not inexpensive devices, and you would not want them to burst accidentally, would you? Here are a few hints for keeping your PSP in superior working shape.
- Maintain the entire parts clear of dust. Just like a PC, dust may harm PSP parts and including the screen. In one case, I left my PSP in a dirty place when I went on holiday. When I got back, there was a one inch fracture on the display.
- Purchase a PSP case instead of a PSP sack. A case is strong and a pouch is cushy. This implies, if you by chance drop your PSP when it is in a case, it will endure the fall. Doing this actually ensures a longer lifetime for your PSP.
- ONLY purchase a memory stick duo that possesses enough storage for what you require. For instance, it is no use purchasing a two GB Memory stick duo, if you just use the PSP from time to time, and you put like five songs and ten images on it. This will save you cash and not make you feel like you squandered money.
Altering the Save File pictures
 * Anytime you save a game, one or two images are made on your memory stick: ICON#.PNG - the 144x80 image showed when you choose your saved file. The #, commonly 0, can be higher whenever a game puts more than one saves in single folder. PIC 1. PNG - the 480x272 background that is showed if you cursor over your save or game disk. Aware of this, you may custom-make your save images and backgrounds by merely substituting them with fresh . PNG files. Nevertheless, be sure that you retain the new file to a lesser degree or same to the master copy file's resolution, or the PSP will chop off sections to make it fit.
First link your PSP to your personal computer. Then find the save file you prefer to modify. Every save is placed in the PSPSAVEDATA folder, separated into different sub folders to retain required files collectively. When you have discovered the save icon you need to modify, put .ori to the end of the filename, just in case you ever prefer to modify it back to the previous condition. Resize the picture you want as you are save icon to 144x80 and then save it as a .PNG with the name ICON#.PNG - “where # was the number discovered on the file you renamed”. After that move the new image into your save folder.
Straight off, anytime you see your save files on the PSP, its image will be the picture you modified it to. Employ the similar technique to modify PIC 1.PNG files to your own custom images, but remember that the resolutions should be at most 480x272. *Do remember this is a little bit complex and could cause losing all saves if not executed correctly. This fine-tune is actually for those who know how to use these types of files.
How to Use Car Audio System to Play PSP Sounds Through FM wave
 Utilise the following directions to have fun with your PSP games and films with your vehicle sound system. You'll require a FM modulator, a audio cable with a male stereo 1/8" earpiece connector at one end and divide right and left RCA connectors at the other. The red cable with the 'in' line fuse attached to your automobile battery or switch. The ground wire is grounded to the car frame. Adjust the vehicle's tape or CD set to the frequency modulation frequency that is on the modulator. The relative frequency is usually 88.7 or 89.1 MHz. Put in the RCA connectors by the audio cable into the RCA jacks located on modulator. put in the headphone end of the cable right into the PSP. Then, you can turn on the PSP with the volume set at half way.
The PSP's audio attached through your vehicle's transmitting aerial. No additional cables are required nor are another adaptations. Your games, song and films will now run through your vehicle's stereo loudspeaker system. Do remember: careful when attempting this and be sure you recognise how to apply the modulation unit and know the correct path to assemblage the cable to the fuze box and ground cable. If this isn't done correctly, this may harm or even fry the PSP.
Firewall Configuration in Windows XP
Microsoft Windows XP Service Pack 2 offers firewall. Firewall inspects and restricts the information that is exchanged between a computer and Internet. Windows firewall is a security tool that protects your computer and its confidential data against anyone who has evil intentions and want to access your personal detail without your permission. It gives you full control to block suspicious software and worms and provides a mean to log security events.
It helps to defend your computer by blocking unsolicited traffic. Unsolicited traffic means any attempt to connect with your machine over a network connection that was not specifically requested by applications running on your system. Therefore, firewall configuration is an essential part so that your applications like Microsoft Internet Explorer and Outlook Express etc can work successfully without any pain.
Firewall configuration is not a heavy task. This blog describes how to configure firewall on a single machine.
Firewall configuration Steps:-
STEP 1: From the Windows XP SP2 desktop, click Start, and then click Control Panel.
STEP 2: Next, in Control Panel, click Security Center.
STEP 3: Windows Firewall general settings allow you to configure these options:
On (recommended). This is the default setting (with Don’t allow exceptions not selected).
Don't allow exceptions. When this option is ON, the firewall is placed into ON with No Exceptions mode which blocks all unsolicited requests to connect to your system.
Off (not recommended). Turning OFF Windows Firewall might make your computer more vulnerable to damage from viruses, worms or intruders.
Thursday, December 22, 2011
Jak and Daxter: The Lost Frontier PSP Game Review
 SCORE: 70
Yes, as was the case with the earliest Jak game, we have a good deal of platforms we have to leap to. You can find poles to dangle from, switches to push, and so forth. After end of this game, Jak may have a humble armory of weapons, but these armaments take a backseat for a moment to leaping from one shelf to another. Largely, this refocus was amazing. I adored the first Jak game, so we have a few good times in this moment -- that is to say the teasers that asked us to teleport, create a shield, and analyze. it.
I am a devotee of this franchise and believed the platforming was amusing, the puzzles with powers were stylish, and also the ship upgrading features and Jak offered some depths. However, the void environses, camera problems, and unvarying nature of a few of the combats mar the game to a point that I could not give it a better score. There is excitement to be had here, however it could have been fine-tuned a little more to bring on the real potentials.
LittleBigPlanet PSP Game Review
 SCORE: 91
If you for some reason overlooked the wonder of this franchise, LittleBigPlanet series is essentially a platforming level – it is a shiny, three-dimensional, HD development of the now ancient Mario Bros. You will control an lovable tiny character called as Sackboy to go through a collection of episodes that have you grabbing, leaping and running from one corner of your LCD screen to the other. That's all – there are just 3 inputs, but the outcomes are anything but straightforward. Levels force you to casting melodic switches to play music, jumping through complex labyrinths that circumvolve as you trot, riding drifting lanterns high into the blue sky, and a lot more. LBP could appear half-witted externally, but where this product shines and where everybody had the absolute excitement is when a challenge does something that is entirely unforeseen and eye-popping – and that occurs a lot frequently than never.
I like LittleBigPlanet in PSP. The platforming is amusing, the creation instruments are satisfying and online is without doubt astounding – particularly taking into account that those upload/download capabilities are on the PSP console. I would like it to work a bit less crannied now and again, have the creation instruments be a little more non-rational, and so forth, but none of those might put a dampen interest on the game for lovers of the series or those looking for the first experience of Sackboy’s experience.
Tekken 6 PSP Game Review
 SCORE: 83
Fighting game lovers have had quite a couple of things to be pleased about in 2009. BlazBlue and Street Fighter IV hit consoles in past a few months and then Tekken 6 finally followed suit. This time around, the most recent in the long-running Tekken series is included on the PSP console. Keeping up with the nitty-gritty console feels with only a couple of removed features, Tekken 6 in PSP is yet one more amazing champion that gamers should revel.
In tournament-level players won't need to learn too much, mechanics wise, due to the fact that it is an amazing game and it works really nicely on a PSP. The reason why Tekken 6 becomes such an amazing portable game is because the interface only needs the use of 4 buttons. As the PSP console has 4 face buttons, it allows for a gameplay to match snugly on your machine, even for dedicated Tekken lovers. If you are a newbie to the franchise, however, Tekken 6 fuses the 'pick up and play' gameplay with some deeply complicated techniques and all the interface mechanism you received on the console variant, though novice players can easily deal with Tekken 6 by squeezing buttons, the actual excitement comes from finding out the game's complex subsystems and acquiring a sense of fighting for fights between two experienced players. Tekken 6 really has a good deal to offer, not to mention a vast roster, elegant interface, many modes and a shiny multiplayer feels.
If you already have Tekken 6 in consoles, the PSP flavor is just about the same. On the other hand, it's a great porting and will provide you many opportunities to practices on the go, so it just could be worth an additional investment.
How to See Where a TinyUrl Is Really Linking To
Most of us have seen it… links to tiny urls on blog posts and for twitter users it’s a common thing… Twitter changes the long link into the tiny urls automatically. But that’s little uneasy as we don’t know where the link is actually linking to … what website is that… what it is all about?? And many such questions. As I also used to get confused about it… whether this site is safe to open or not...maybe it’s containing some kind of virus in it. As such it doesn’t matter too much … as I know the solution for virus removal.
Go to TinyUrl.com site, you don’t have to register or make log in id…. There is a feature on that site that will show you a preview of the final destination URL.
Just click that option “Click here to enable previews”
And now when you click on a TinyUrl link like this one…
http://tinyurl.com/6h8van, you will be taken to page on tinyurl.com that will show the final destination link.
Tuesday, December 20, 2011
Economics and Software Piracy
The copyright violation of computer software which is usually known as software piracy involves the unauthorized copying of computer software. This kind of software piracy is very common. Many companies have copyright laws which applies to software, but the degree of control varies.
If computers software were inexpensive, would people pirate less? Lowering the prices of software would be an effective solution if profitable factors were the primary cause behind piracy. Software developer companies can lower the price of their software by producing it in large volume.
Experts in these disciplines ranging from economics, sociology and psychology have observed the motivations behind software piracy carefully. There is no internationally accepted explanation for software piracy. But experts in multiple disciplines have given a number of reasons that contribute to a person's decision to steal software.
It is true that most of the people steal software because of its cost, but let us forget the money issue for now. If the price is higher for a person then what he/she is willing to pay, that person might pirate the software. A common explanation for software piracy goes something like this: The software company is large and makes billions of dollars. One stolen piece of software would not effect the economical conditions of an organization. In other words, since the organizations can not feel the loss so, stealing from them isn't wrong.
A research into this concern suggests that most of the software pirates steal programs regardless of the software's price tag. A study suggests that most of the people view digital property differently than physical property. They don't place as great a value on software as they would to a physical object like a vehicle or a House. People think that stealing a software isn't the same as stealing a physical object because the software is being copied rather than taking a physical object. In short, stealing a software is not a crime because they feel software to have less value than physical objects.
Latest Devices and the Operating Systems
Do you think that it is you who are in-charge of controlling a computer? Think again! There is the trustworthy computer mouse, which you can move anywhere on the desktop, evoking up your music library or Internet browser at the slightest wave. Youfeel like a director while using your desktop or laptop but there is a lot going with in the computer and the the real man who handles all the task is the operating system.
Most of the desktop or laptop PCs come pre-loaded with Windows operating system. Macintosh computers come pre-loaded with Mac OS X operating system which is developed by Apple. The first thing loaded into the computer system is the operating system because a computer is useless without the operating system.
More recently, small computers have also started using the operating systems instead of any other software. Like Microsoft has launched different versions of Windows Mobile which is being used in mobiles such as Apple's iPhone, Microsoft's Zune and many more. If you like to experiment with electronic devices, you must be well aware with the facts that that operating systems are now available on many of the devices which we use every day like cell phones, wireless access points, digital players etc. The small computers used in all these daily use electronic devices are so powerful that they are now capable of running an operating system and all those applications that are used on a computer. The modern cell phone is now more powerful than a desktop computer, so this improvement makes sense and is a natural development.
The operating system organizes and controls hardware and software to make that device behave in a pliable but predictable way. For devices, an operating system creates the capability to:
serve for different purposes
interact with users in more complex ways
keep up with requirements that change over time
Monday, December 19, 2011
10 Steps To Becoming A Celebrity Assistant
Ok so how about exploring some new ideas for your career.
Forget the regular 9-5 jobs. I was reading the other day about unique career paths and came across this fabulous article and I thought I would share it with you.
------------------------------
Celebrity personal assistant's can make upto $100,000 per year, and enjoy an incredible lifestyle that most people can only dream about. In return for screening fan mail, answering phones, and planning parties, celebrity personal assistants are allowed to enter an exclusive world and live like a star.
After all, celebrities need to buy groceries and schedule doctor's appointments just like everyone else, but unlike everyone else they also have movie shoots, important meetings, and volumes of phone calls to make. The personal assistant makes sure that everything gets done, allowing the celebrity to enjoy a semi-private life. A good "CPA" functions as coordinator, accountant, and just about anything else that a famous person might require. They offer organization and peace of mind to those who need it the most.
CPA perks often include tickets to sold out concerts, first-class air travel, expensive gifts, and great gossip about what other celebrities are really like. Does this sound like a great day at work to you? If so, here are 10 steps to breaking into this growing field of employment, based on the fabjob.com How to Become a Celebrity Personal Assistant.
1. Choose a Type of Celebrity
Actors and rock stars are not the only ones who need personal assistants. You could decide to assist professional athletes, politicians, directors, bestselling authors, wealthy families, motivational speakers, dot-com millionaires… basically anyone with enough money can hire someone to be a personal assistant. It's probably best to work for someone in a field you're interested in, because the more you know, the more you have to offer. Potential employers will find you more appealing as a new hire.
2. Develop Your Skills
CPAs need to know a little bit about everything, and know where to find out more. Celebrities are currently looking for Internet-savvy, technologically competent employees who can show them how to transfer information from their palm pilot to the computer, send an e-greeting to Mom, or keep track of their personal finances.
Most celebrities are also interested in your typing skills, etiquette knowledge, and party planning or gift buying ability. Above all, celebrities need to know that you will not reveal their intimate secrets to the National Enquirer, so make sure you get used to practicing the art of discretion as well.
3. Get Some Training
There is currently no formal long-term education program to become a personal assistant, but you can develop many of the necessary skills in related programs, such as computer courses, household management courses (for butlers and household managers) and event planning courses offered by community colleges.
4. Get Some Experience
One great way to learn the skills of being a celebrity personal assistant is to be a non-celebrity PA first. You may even discover that being a personal assistant to a non-celebrity is more your speed if you really enjoy organizing but don’t like the stress of the celebrity lifestyle.
5. Find a Job Opening
Networking is an important first step: let everyone know that you are a CPA who is looking for work. Think about all of the people you know, family and friends alike. In that vast network, is there anyone who is closer to a celebrity than you are? You can also meet celebrities through volunteering, working as a production assistant on a movie set, and job listings.
6. Contact a Celebrity
Although you may not speak with the celebrities themselves, you can usually get in touch with their publicist, agent or even their current personal assistant. Even if they aren't looking for an assistant immediately, they may have an opening in the future or know someone who does. There are many books and websites available that list addresses and contact information for celebrities.
7. Avoid Common Mistakes
It would be great if you could just strike up a conversation with someone like an agent and get an immediate referral to a celebrity. However, most people who are starting out don’t find it easy to say the right things off the top of their head. This is when having a script can be a tremendous help. A script is simply an outline of what you want to say. To sound like a professional avoid disclosing too much personal information about yourself, sounding too eager, or mentioning that you are hoping to launch your own showbiz career. Instead, focus on what you have to offer the celebrity.
8. Join an Agency
Most CPAs agree that this is a great inroad into the industry. Once you’ve located one (more than a dozen agencies are listed in the fabjob.com How to Become a Celebrity Personal Assistant), send a brief email query asking who you should contact about becoming a CPA for one of their clients. Sign up with as many agencies as possible.
9. Ace the Interview
According to Jonathan Holiff, former personal assistant to several celebrities, "Assuming you have the skills and the temperament, it really comes down to a personality match." You will more than likely have to go through a number of interviews before you get to meet your celebrity. Don’t let it faze you; just be honest and direct with everyone you meet. And when you meet your celebrity? Don't gush. Concentrate on being professional and establishing an immediate rapport with them.
10. Join Professional Organizations
There are professional organizations that assist celebrity personal assistants with their career development. Once you start working as a CPA, you will be able to join these organizations and they will become an invaluable source of support and information.
FabJob.com publishes e-books that can help you break into a "fab" job. Visit www.fabjob.com for information.
How to reinstall the LCD?
You are nearly there. The trickiest part of this step is to be sure that the LCD backlight power strip (the small one) is properly seated. You will note two small extensions on the sides of the strip near the end. These will come in handy when you attempt to seat the connector. Figures below highlight the areas you will be working with when reinstalling the LCD.
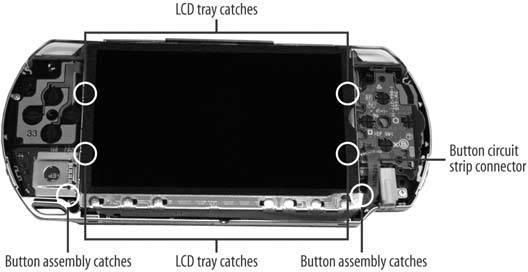
To reinstall the LCD:
To reinstall the LCD:
- Lay the LCD tray into place. Do this slowly and carefully, since the wrong position can cause problems. The top of the tray should slip behind the USB connector. The bottom of the tray has a screw mount that slides under/behind the black PSP shell. Finally, the left side of the tray merges with the left controller. Once it is in place, shut the UMD tray. If it clicks smoothly shut, the tray is probably installed correctly.
- Insert and tighten screws 8, 9, 10, 11, 12, and 13.
- Flip the LCD over on its back, slide the large and small circuit ribbons into their respective slots, and close the catch. Start with the large ribbon first, and then do the small ribbon. Use the little wings on the small ribbon to guide it into the catch.
- Flip the LCD over and carefully insert it into the tray. Start with the right side, and then apply light but firm pressure on the left side to click the LCD into place.
Sunday, December 18, 2011
Installing the Main Circuit Board
This post is about the hardest part of reassembling the PSP. It can be a bit tedious to ensure that you have the board seated correctly, but patience is necessary. Pay attention to the critical areas highlighted in picture below: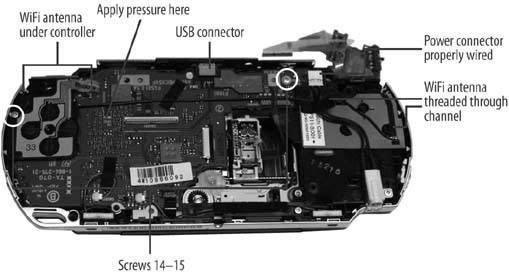
To install the main circuit board:
To install the main circuit board:
-
Place the main circuit board in roughly the correct location.
-
Carefully bend out the top of the PSP plastic case and slip the USB connector into its corresponding hole.
-
Line up the screw holes and apply a slight but firm pressure about one inch in from the left side of the circuit board. This is to seat the connector on the other side of the board into the smaller circuit board that holds the WNIC and Memory Stick components.
-
Run the antenna wire across the circuit board and install the wireless antenna. Once the antenna is properly seated, install the antenna wire correctly, ensuring it is held in place by the black fuzzy tape, and that it is threaded through the channel on the right side of the PSP.
-
Line up and insert screw 15 to install the left controller. If you removed the left controller completely from the PSP, be sure to connect the circuit ribbon.
-
Insert screw 14 in top-right hole of the main circuit board.
-
Connect the white power connector to the PSP circuit board, using the fuzzy tape to hold the wires onto the board.
-
Lay the right controller on top of the antenna and snap it into place, paying attention to the catch on the lower side of the controller circuit.
-
Connect the right controller strip by sliding the ribbon into the catch. It will slip under the tiny silver guides on each side of the catch. Finally, flip the brown movable part of the catch down into place.
-
Slip the UMD drive circuit ribbon into its catch. Be sure that the black part of the catch is in its Out position. Otherwise the ribbon will not insert into the catch. Once it is lined up in the catch, apply pressure to both sides of the black catch to seal the connection.
Saturday, December 17, 2011
Make iGoogle Your Startup Page in Microsoft Outlook
I m a regular user of Microsoft outlook and I use iGoogle as my dashboard and as I m in habit of trying new things on my Windows XP desktop, I tried to combine both Microsoft outlook and iGoogle, which is really very simple to do…
In order to combine both of them, we have to create a new folder, and then give it a suitable name accordingly. Now right click on the new folder and choose properties, and then go to homepage tab, check the box for “Show my homepage by default for this folder”. Than write the url of iGoogle, which is - http://www.google.com/ig
You can change that anytime, and make any other web page as your homepage.
By now, we can view our iGoogle page as our homepage by just clicking on the folder.
Set iGoogle as the Default Startup Page
Open up the Options panel through Tools \ Options on the menu, and then choose the Advanced Options button on the other tab.
You'll see a setting for "Startup in this folder" with a Browse button next to it. Click that button and choose the iGoogle folder as your startup page.
Now when you startup Outlook, you'll be taken directly to your iGoogle dashboard and for the first time it asks for login.
Turn on Remote Desktop in Windows Vista
Add More Functions to Office 2007 by Installing Add-Ins
Find a Forgotten Password Saved in Firefox
Configure Auto Archive In Outlook 2007
Thursday, December 15, 2011
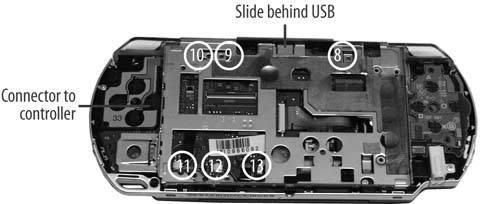
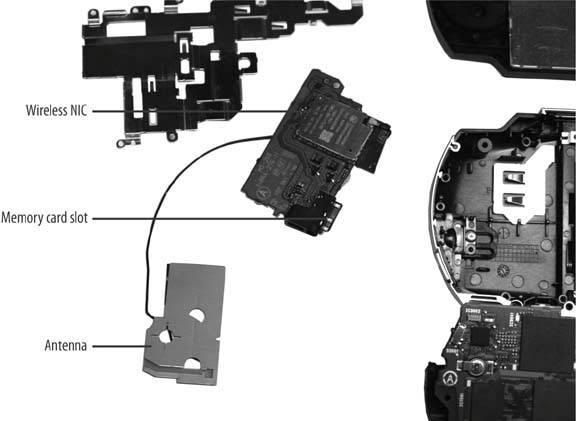
How to reinstall network card?
This step is fairly simple, with the only tricky part being the correct insertion of the WNIC (wireless network interface card)/Memory Stick circuit board. Be sure to take advantage of the many guide pins included in the PSP to ensure that you insert this component, and others, correctly.
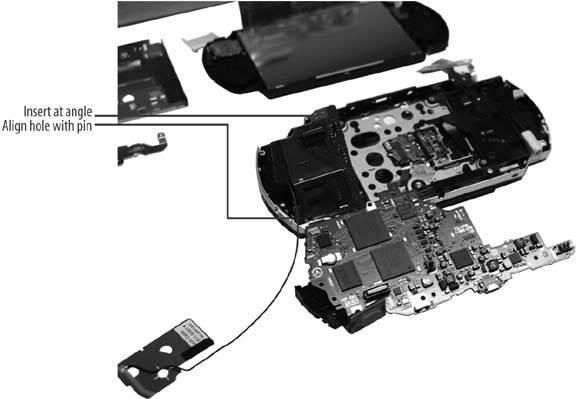
To install the network card:
-
Insert the small circuit board, wireless network card side down, into the PSP by placing the bottom of the circuit board in first at an angle. Be sure that the wireless antenna is wrapped around the side of the board.
-
Lay the metal grounding separator in, with the long end at the top. Align the guidance pins and the circuit socket to be sure the separator is in the correct location.
-
Place the black plastic supporting piece on top of the WNIC, ensuring that both the top and bottom guide pins slip through their respective holes. Be careful to not break the wireless on/off switch as you insert the black plastic piece. You will probably have to move the switch into the On position for easiest installation.
-
Insert screws 16, 17, and 18.
Wednesday, December 14, 2011
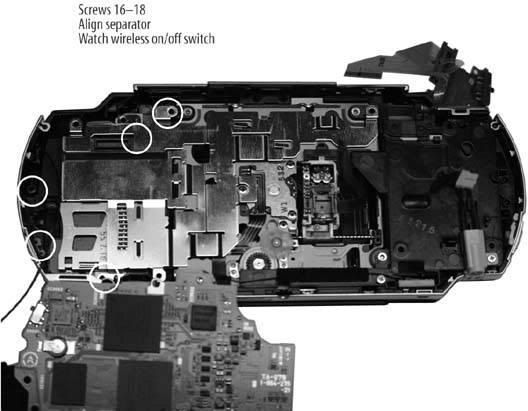
How to remove network card from your PSP?
The following requires you to remove several components before you actually get the network card board (SWU-BXJ154N). This part of the removal is layered, so be sure to follow the instructions. Figure 1 highlights the significant pieces and Figure 2 provides a shot of the network card with antenna and wire.
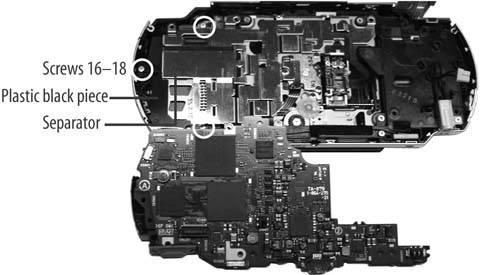
To remove the network card:
To remove the network card:
- Remove the silver screw (16) from the top left of the PSP, holding the silver tray onto the device.
- Remove the silver screw (17) from the bottom left of the PSP, holding a black plastic supporter.
- Remove the silver screw (18) from the left of the PSP, holding the black plastic supporter.
- Lift the black plastic piece out and then remove the silver grounding tray.
- Lift the network/Memory Stick combo circuit board out of the PSP shell.
Tuesday, December 13, 2011
Purdue University's OWL or Online Writing Lab - Great resource

Purdue University's OWL (Online Writing Lab) offers a wonderful resource. Don't sabotage your job search with grammatical and/or spelling errors in your resume, cover letter, and other correspondence. Brush up on your knowledge here. It is a great resource. I have used it for my kids and its all worth it. Very easy to navigate.
Here is what they say..........
In this section of our site, we offer you handouts and exercises on grammar, spelling, and punctuation. We also have PowerPoint presentations related to grammar, and we have an entire section of handouts and resources for English as a Second Language learners that might also prove useful.
We now have printer friendly versions and Adobe PDF versions of all of these handouts available. Visit our printer-friendly grammar, spelling, and punctuation index to download and print any of these handouts, or click on the link on any of the handouts to visit the printer-friendly version.
How to remove PSP mainboard?
This part of the disassembly process is the most difficult. The main board is connected via screws, a USB connector, and a circuit connector hidden under the board. In addition, there are wires at the lower end of the board that connect to the speakers and components under the board. You do not have to remove these to get under the board if you simply flip the circuit board over onto its top when it is removed. 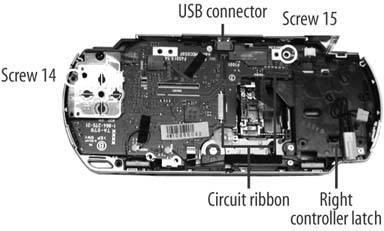
To remove the main circuit board:
-
Unlatch the right controller circuit strip and the UMD drive circuit strip.
-
The controller lifts from the bottom, and the UMD catch requires slight pressure from the left against the black plastic arms.
-
Remove screw 14 from the top right of the circuit board.
-
Remove screw 15 from the left side of the left controller.
-
On the top right of the main circuit board, carefully remove the power connector (white with black wires). This will require you lift the board first before disconnecting the white plastic socket.
-
On the lower side of the left controller, pry up the circuit board over the catch and lift the controller over the top of the PSP.
-
Peel back the tape holding the black power wire and lift the antenna off the main circuit strip, disentangling it from the tape and the right controller.
-
Slowly lift the circuit board up off the PSP by slipping out the USB connector from the top plastic shell, then raising the top of the board and flipping it over the bottom of the PSP. You will need to apply pressure and pry the board off a hidden connector that keeps the board connected to components deeper inside the PSP.

Chip 1
-
CXD2962GG
©2004SCEI
507D10E
641711
Chip 2
-
CSD1876
©2004SCEI-102GG
504A99E
278491
Chip 3
-
SAMSUNG 501
K5E565H8CM-D060
Chip 4
-
SC901583EP
MXAEA0423
Chip 5
-
MB44C001
0505 M51
Monday, December 12, 2011
Turn on Remote Desktop in Windows Vista
If you want to access your Vista PC from another Computer, it’s essential for you turn Remote Desktop ON, which is disabled by default in windows Vista. Don’t worry it’s very simple to turn it on.
Go to the configuration page, there are 2 ways to go to configuration page>
>>Right Click on my computer icon and choose properties,
>>Type system into the start menu search box. It will be the 4th item in the list.
Now you have to check Remote settings link on the left hand side. Now you can turn it on:
If you want to connect from another Computer (installed with Windows Vista) on the same network, click the bottom radio button. And if you want to connect to Windows XP or Windows 2000, then click the “Allow connections from computers running any version of Remote desktop” radio button. To connect from another Vista PC on the same network, click the bottom radio button. If you need to connect from an XP/2k machine, click the "Allow connections from computers running any version of Remote Desktop" radio button. Vista will automatically do the settings for firewall. But remember it will not work for home editions of vista.
Add More Functions to Office 2007 by Installing Add-Ins
How to Detect and Repair Applications In Microsoft Office 2007
Configure Auto Archive In Outlook 2007
How to Add Effects to Your Pictures in Word 2007
AOL Instant Messenger in PSP

Even thought America Online is not likely to release a PSP Instant Messenger version of AOL soon, you don’t have to be without your buddy list. Using your PSP’s Web browser you can log on to WebAIM at www.webaim.net, type your username and password, and access your buddy list, send and receive instant messages, and more (see Figure for a look at WebAIM in action in a regular PC browser).WebAIM even has a login page made especially for PSPs, with an on-screen keyboard to save you time entering your username and password—just head over to http://dev.webaim.net/psplogin.jsp.

Figure shows WebAIM in action on my PSP using Sony’s Web browser, which is enabled in the Firmware 2.0 update. Of course, you can still use the Wipeout Pure Web browser, so you don’t have to upgrade to Firmware 2.0 and lose the ability to program your PSP and run homebrew applications.

WebAIM’s free servers are often pretty crowded, so getting one can take a while. I opted to pay for their premium service, which guarantees me access any time of the day, for around $4 per month or a scant $17 for six months.
Creating the Wipeout Directory

The Wipeout Web browser looks for documents to be stored in a folder called “wipeout,” so you need to create that folder. In your Web server’s documents folder, create a folder named wipeout. Create folder in the c:\inetpub\wwwroot, a folder that Microsoft’s IIS Web server generally uses. For MooPS you will simply place your files in c:\Program Files\MooPS\ROOT, where c:\Program Files\MooPS\ is where you installed MooPS—no wipeout directory is necessary.
Configure the DNS Server

You need to trick Wipeout Pure into loading your Web page instead of the one it expects. You do this by spoofing the location of the server that the game looks for. Once it finds your page, the sky’s the limit.
It’s probably not a good idea to make your DNS server publicly available. Not only may the traffic get unmanageable, but Sony’s legal team may call you telling you to cease and desist. If you leave this on your local network, or at least undisclosed to all the hack boards out there, you should be safe, but there are no guarantees if you open your hack up to the public.
If You’re Using Windows
Follow these steps:
1. Make sure MooPS is running.
2. Configure MooPS’ Server Settings menu
If you’re using a Web server other than MooPS, set the MooPS Port under Web Server to 33333 so it doesn’t conflict with your Web server.
If You’re Using BIND on Unix or Mac OS X
In the case of BIND, you will be creating a zone file to spoof Sony’s Web site,
ingame.scea.com. I will assume that if you have a BIND instance running, you already
know how to configure BIND, so we won’t go over it here. There are many fine books on setting up BIND, so hop onto Amazon.com or go to your local bookstore and you’ll find some excellent guides.
The zone file for BIND should have the following contents:
; scea.com zone file
$TTL 86400
@ IN SOA scea.com hacked.scea.com (
2005070942 ; serial number YYYYMMDDNN
28800 ; refresh interval
7200 ; retry interval
86400 ; expire timeout
86400 ; min. time to live (ttl)
)
; spoofed entries to point traffic to our local server instead of out on the Internet NS 192.168.2.1 ; says where the name server is (us, haha)
A 192.168.2.1 ; points the root to this IP address Ingame A 192.168.2.1 ; resolves ingame.scea.com to our local server Webcluster A 92.168.2.1 ; resolved webcluster.scea.com to our local server
Next you need to update your named.conf file and add the scea.com zone, as shown in the following code. Enter the text at the end of the file’s contents and then save the file. Like the zone file, be sure to use the tab key, not multiple spaces, when adding the entry.
zone “scea.com” {
type master;
file “scea.zone”;
};
Configuring DNS If You’re Using Mac OS X’s Built-In Web Server

Follow these steps:
- Open System Preferences from the Apple menu.
- Select Sharing.
- Under Personal Web Server, click the On check box and then click Start.
- Close the System Preferences window.
Sunday, December 11, 2011
Not hiring: pretending you didn't get their resumes is no way to deal with rejection. Applicants need to know when it's over - Staff Smarts
ANOTHER WEEK, ANOTHER HIRING DECISION !
For growing companies, finding the perfect person for a job is just another thing to check off the to-do list. If one resume doesn't look good, keep rifling through the stack. You have plenty to choose from, and you only have to call the best people. The rest should get the hint when the phone doesn't ring.
But for unemployed job seekers on the other side of the fence, applying to your company is a serious endeavor. Ignore them, and you could be encouraging some desperate job seekers to become what Carole Martin, an interview coach in Danville, California, and the interview expert for Monster.com, calls "Tasmanian devils": overly aggressive job "stalkers" who hound you with calls and e-mails, or stop by the office hoping for some face time to find out where they stand.
These applicants don't know when to quit, says Martin. "They're thinking 'If I call just one more time, they'll take my call.'" Add to this a cultural message that tells applicants to be aggressive and persistent with employers, and you can end up becoming the hunted if you don't know how to handle the situation.
Hello, Goodbye
In this fragile hiring climate, some applicants are mistaking professional courtesy and friendliness--in the form of "We'll call you"--as a sign you like them, says Martin.
It's crucial for you to give firm messages instead of mixed signals. If a candidate is not in your top 10 percent and won't be interviewed, say so. If you won't be hiring this person but want to keep the resume on file for future openings, let the applicant know. "You have to close the door," Martin says.
Of course, doing it is the hard part. Brian Barth, CEO of SideStep, a 21-employee online travel search company in the Silicon Valley with annual sales topping $3.5 million, hears a few times a week from aggressive job hunters and recruiters who contact him directly rather than going to the company's Web site, which lists job openings, accepts resumes, and generates an automated e-mail response letting applicants know their applications have been received. "We prefer that people send their resumes to our e-mail address," says Barth, 36. "Some people don't want to follow the process."
Barth forwards the unsolicited messages to his HR person, who screens up to 25 new resumes every day. With such volume, getting back to people who won't be interviewed is impossible for one person to do, Barth says. But if a rejected applicant follows up after a job has been filled, the company tries to offer closure. "When you're clear with people, you don't have a problem," he says.
Take some simple steps today to make the rejection process easier for everyone involved. Start by minimizing the things you don't need to do. A lot of small employers interview every person who applies, a mistake because it only encourages applicants while making it harder to get back to all of them. Instead, select the top 10 percent of the resumes for phone screenings and narrow this field even further for in-person interviews.
Also, limit "mercy interviews"--interviewing friends of friends--which can easily lead to unreasonable expectations. If you feel obligated to speak with someone who doesn't seem right for the job, set it up as an informational interview where you answer basic questions about your company and your industry, but make it clear that it's not a hiring situation, says Patrick J. Lennahan, principal consultant of P.J. Lennahan & Associates, a career consulting firm in Portsmouth, Rhode Island. That way, you fulfill an obligation without leading the person on. "Don't build up people's hopes if there's no opportunity there," he says.
If you're deluged with applications, consider bringing in an extra person for a few hours a week during a hiring phase to send out rejections and arrange interviews. Also think about setting up separate voice mail and e-mail boxes for applicants so their inquiries are easier to track. While a stock e-mail reply isn't as nice as a letter or a phone call, it's a cheap and easy way of letting applicants know they didn't make the cut.
Good Impressions
Of course, a form letter rejection won't be enough for the occasional applicant. What should you do with someone who calls wanting to know why they were rejected? In many cases, employers aren't getting back to people they've rejected because they're worried about potential legal liabilities. Take the time to resolve the issue, but keep the conversation away from specific information that can get you into trouble, such as a personality fit. "Say 'We found someone with more skills and experience,'" says Martin.
Furthermore, letting applicants know where they stand is a good public relations move on your part. The people you come in contact with during your hiring efforts are more than just job seekers; they're also potential consumers who will run and tell their friends how your company treated them. Besides, it's a small world out there, and the applicant you ignore today could someday end up working for your main competitor or biggest client tomorrow.
Whatever interaction you have with [applicants] is going to bespeak your reputation," Lennahan says. "You've got to make a good impression."
Written by CHRIS PENTTILA
Freelance journalist, NC
chris@sitting-duck.com.
Friday, December 9, 2011
How to remove the LCD Tray?
The most important part of this stage is that you carefully record where each screw goes. Since most of the screws are different sizes, it would be easy to mix them up. Picture below illustrates where each of the screws is located.
Be careful not to strip the screws. It is better to apply pressure to ensure the screwdriver head does not slip than it is to strip the screw.
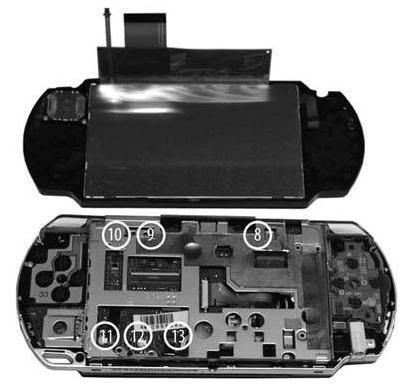
Be careful not to strip the screws. It is better to apply pressure to ensure the screwdriver head does not slip than it is to strip the screw.
Here's how to remove the LCD tray:
-
Remove the silver screw (8) from top right of tray.
-
Remove the two silver screws (9 & 10) from the top left of the tray.
-
Remove the two silver screws (11 & 13) and one black screw (12) from the lower left of the tray.
-
Eject the UMD disk tray.
-
Lift the tray from the bottom of the PSP and slowly wiggle it loose from the UMD catch at the top of the PSP.
Add More Functions to Office 2007 by Installing Add-Ins
I use Excel more often…I just can’t work without it. Excel is best for maintaing data. Yesterday I was exploring Microsoft Excel which was quite fruitful. They are many features in it. I m not talking about Vlookup and other formulas. I am talking about add ins, which you may not get bundled with Microsoft Office and not included with the initial installation, which can be easily accessed and installed. I would like to share my some of experience with you… may be these add ins cab be useful to Excel users as they are to me.
Open Excel and then click on Office button and go to Excel Options and then Add-ins.
In the View and Manage Office Add-ins window, near the bottom. Don’t forget t to select “Excel Add-ins” in the drop down box and click Go.
This will open up the Add-Ins window, there you can select an appropriate package for your Excel tasks. If you highlight each Add-In then you will be provided with a quick description of what each one is.
Like I installed the Euro Currency Tools. After choosing the one you want click OK and accept the default. You will get the progress message while the add-in is installing.
After the add-in is installed it will be available in the Ribbon. In this case the Euro Currency Tool was place under the Formulas tab other add-ins may vary. Other times you can install an add-in from downloading an executable from the Microsoft Office site. Of course there are also third party add-in programs that usually require purchasing a license after a trial period.
More on Tech Support>>
Find a Forgotten Password Saved in Firefox
How to Detect and Repair Applications In Microsoft Office 2007
Configure Auto Archive In Outlook 2007
How to Add Effects to Your Pictures in Word 2007
Thursday, December 8, 2011
How to Troubleshoot System Restore tool in Windows XP
This post provides windows xp tech support to describes how to perform troubleshooting steps for issues that may occur when you try to use the System Restore tool in Windows XP.
If System Restore does not start, follow these steps:
1. Run Windows Update to check for and to install any system updates. Visit the following Microsoft Web site to check for updates:http://windowsupdate.microsoft.com
2. If you are prompted, restart the computer.
3. After the computer restarts, click Start, click All Programs, click Accessories, click System Tools, and then click System Restore.
Follow the given method:
Make sure that the System Restore service is running
To do this, use one of the following methods:
* Look in Control Panel. To do this, follow these steps:
1. Click Start, click Run, and then type compmgmt.msc in the Open box, and then press Enter.
2. Expand Services, and then click System Restore Services..
If the Status of System Restore Service is not Started, click Start on the toolbar to start it.
* Open a Command Prompt window. To do this, follow these steps:
1. Click Start, click Run, type CMD in the Open box, and then press Enter.
2. Type Net Start at the command prompt to make sure that the System Restore Service is up and is running.
If the System Restore Service is not listed, type net start "System Restore Service", and then press Enter.
Wednesday, December 7, 2011
How to remove the LCD?
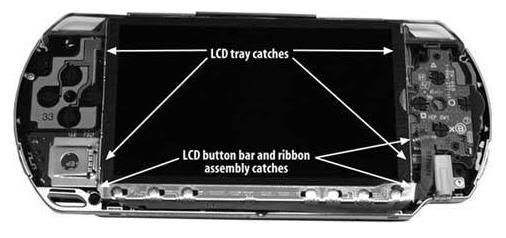

The next step is to remove the LCD from the PSP. Be careful, as this is arguably the key component to your device and almost certainly the most expensive to replace. A scratch or too much pressure could cause serious problems.
-
Carefully pry the catch off the left side of the lower button circuit strip with a small flat head screwdriver.
-
Lift the button bar assembly off the PSP.
-
Carefully release the catch to the circuit strip that connects the bar to the PSP. This is accomplished by using a small flat head screw driver to lift the brown catch up, which allows the circuit strip to slide free of the catch.
-
The LCD is held in place by four bevel catches to keep the LCD screen in a metal LCD tray. Carefully slide a flat head screwdriver between the LCD screen and the tray at the top-left corner and lift the LCD screen out of the tray. Once it has freed the catch, do the same on the lower-left side of the LCD tray. Once this side is free, slowly lift the LCD screen up a few millimeters out of the tray and then lift only the top of the LCD screen. There are two circuit strips behind the LCD that need to be removed before taking out the LCD.
-
Lift the left (smaller) catch from the top to release the circuit strip.
-
Lift the right (larger) catch from the bottom to release the larger strip.
Getting a feeling when releasing the catches takes a little practice. You must not break off the plastic catches or break a circuit in the connector.
Ways to Upgrade Your Windows XP Computer to Windows 7
Migrating from Windows XP to Microsoft Windows 7 isn’t easy because Microsoft has only built a migration path from Vista to Windows 7. Microsoft is expecting that most of the XP users are going to to replace their older Windows XP PCs with Windows 7 computers but for this your PC or laptop must have the hardware requirements to run Windows 7 on it.
There are some different methods to get to Windows 7 without buying an entirely new PC.
Use the User State Migration Tool:
This is an application developed by Microsoft so that you can migrate your user profile from Windows XP to Microsoft Windows 7 installation. But beware because this is a anticipated tool. To see how to upgrade your PC using this User State Migration Tool, you can watch a 12 minute video on TechNet that explains the steps exactly.
Use Windows Easy Transfer:
Using Windows Easy Transfer you can copy files and settings from one computer to another, but this applications does not allows you to copy files from one installation of Windows to another on the same PC. Microsoft has designed a new application that allows you to use Easy Transfer to upgrade in-place on the same computer and they have explained this process in a five minute video.
Use a LapLink cable:
You can also use a $20 cable in-place of using any upgradation application. This is same as that of Microsoft’s Windows Easy Transfer approach.
Subscribe to:
Comments (Atom)